How to monitor servers with broken TLS in Checkmk 2.3
 on Mar 26, 2024
With Checkmk 2.3.0 we bumped the version of OpenSSL from 1.1 to 3.0. This means much stricter defaults regarding security relevant ciphers, handshake and renegotiation settings. You might experience failing active checks for all kinds of services, including but not limited to check_http, check_smtp and several others. Here is how to work around potential problems.
Since the humble beginnings of Checkmk, OMD has been a way of packaging all components of a monitoring system. This not only included the monitoring core, the web interface, and the database components. It also meant packaging libraries such as OpenSSL or the Python interpreter in specific versions that are consistent for all supported operating systems. This component consistency is required to guarantee consistent behavior on rather old systems like the still supported RHEL 8 while simultaneously supporting new systems like the soon-to-be released Ubuntu 24.04.
One major update that accompanied the 2.3.0 update of Checkmk is the change from OpenSSL 1.1 to 3.0. The OpenSSL developers worked hard on removing old ciphers, legacy protocols and extensions and switching to more modern (read: more secure) defaults. This inevitably breaks compatibility to older software or hardware, resulting in failed active checks in Checkmk.
In general these failing checks should be used as an indicator that the monitored host either has to be updated to more modern TLS libraries or at least TLS specific settings should be adjusted to more secure defaults. During internal tests with the Checkmk 2.3.0 beta, this has already worked in most cases.
However, changing TLS settings might not be possible in all cases. Reasons such as maintaining a broad compatibility with other older systems can be valid. For systems where neither updates nor configuration changes are possible, you might want to change the behavior of OpenSSL 3.x to be able to communicate with these systems. This is done by overwriting the OpenSSL default configuration with a more permissive custom configuration that will only be applied to affected hosts.
TL;DR:
With Checkmk 2.3, OpenSSL is updated to version 3.0. As a result, TLS standards become stricter, which may cause active checks (e.g., check_http) to fail on older or misconfigured systems.
- Recommendation: Update systems or use secure TLS settings.
- If this is not possible, you can provide a custom, less strict OpenSSL configuration for the affected checks and run the check plugin with it.
Simulating the behavior
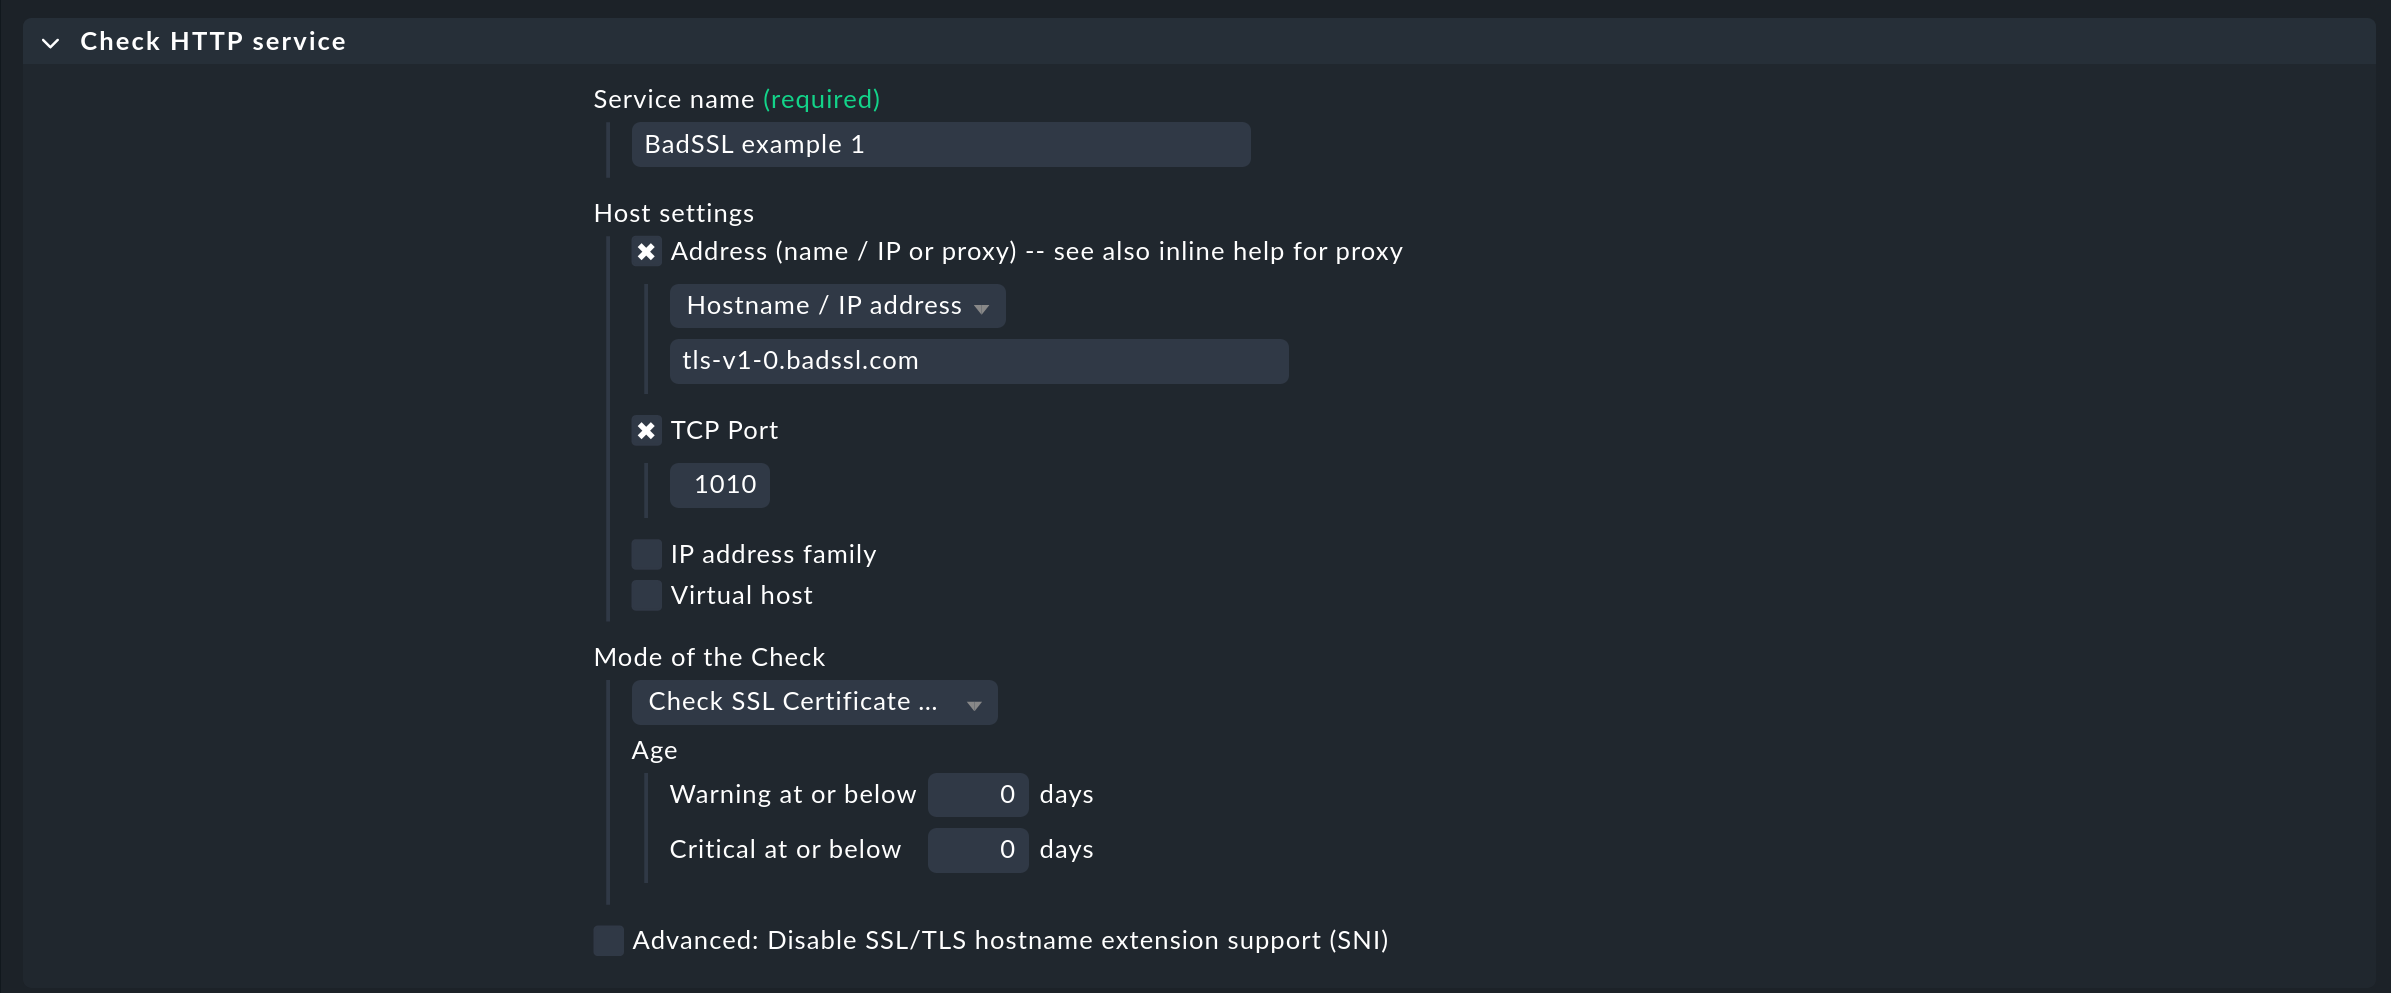
Consider this as an optional step that can be helpful if you do not have constant access to an affected system. This might apply to hosts that are located in different networks and only reachable from remote sites. Or when you are a Checkmk partner and are trying to work around your customers' problems. Here, the BadSSL project at https://badssl.com/ comes in handy. It provides you with all kinds of outdated or ‘misconfigured’ SSL endpoints that can be used for testing. Configure a rule (here for an active check on an HTTP service) in which the details of a failure match the failure encountered with the host in your monitoring.
“Setup > HTTP, TCP, Email, … > Check HTTP service”
The check output should now be “CRIT - Cannot make SSL connection”:

Building the workaround
First step: Create the custom OpenSSL config file
Create a configuration file in the site user’s etc/ folder. Our example just uses the filename unsafe_openssl.cnf. In larger environments you might end up with several different files for addressing multiple different issues:
OMD[heute]:~$ cat << EOF > etc/unsafe_openssl.cnf
# DISCLAIMER:
# This configuration is _very_ insecure.
# Please reconsider if it is possible to upgrade the monitored system instead.
# Proceed at your own risk.

# Tell openssl which section to check
openssl_conf = openssl_init

[openssl_init]
# Which section to use for tls/ssl related options
ssl_conf = ssl_configuration

[ssl_configuration]
# system_default will be applied during any creation of the SSL_CTX structure
system_default = policy

[policy]
# To read up on these options go to:
# https://www.openssl.org/docs/man1.1.1/man3/SSL_CONF_cmd.html

MinProtocol = TLSv1
Options = UnsafeLegacyRenegotiation

# The Ciphers and the seclevel are explained here:
# https://www.openssl.org/docs/man1.1.1/man1/ciphers.html
# https://www.openssl.org/docs/man1.1.1/man3/SSL_CTX_set_security_level.html
CipherString = DEFAULT:@SECLEVEL=0
EOF
Second step: Copy the command line of the failing check

Now you need to identify which plug-in is used. Switch to the details of the check and determine the plug-in name. This is the string between ‘check_mk_active-’ and the ‘!’. You will also need the arguments that are shown after the first (and usually only) exclamation mark ‘!’.
In this case you will need to copy the following:
Plugin: http
Arguments: -C 0,0 --sni -p 1010 -I tls-v1-0.badssl.com -H tls-v1-0.badssl.com
Third step: Integrate Nagios plug-ins
The workaround basically consists of running the check plug-in with a different environment that makes the plug-in use the more permissive configuration created in the first step. Navigate to
“Setup > [show more] > Other services > Integrate Nagios plugins”
Now you need to construct the new command line. Prefixing the path with the environment variable tells openssl to use the unsafe_openssl.cnf file you created in the first step:
OPENSSL_CONF="$HOME/etc/unsafe_openssl.cnf"Then you specify which program to use. The command is the plug-in name, retrieved in the second step, prefixed with check_. Plug-ins usually reside in the site specific lib/nagios/plugins/:
$HOME/lib/nagios/plugins/check_httpFinally add the arguments you also noted down in the second step:
-C 0,0 --sni -p 1010 -I tls-v1-0.badssl.com -H tls-v1-0.badssl.com
This quick hack converts the copied command to the one using the modified configuration file. Use at your own risk and always double check the results:
echo '<<<COPIED COMMANDLINE>>>' | python -c 'import sys; cmdline = sys.stdin.read().strip(); cmd, args = cmdline.split("!", maxsplit=1); cmd = cmd.removeprefix("check_mk_active-"); print(f"OPENSSL_CONF=\"$HOME/etc/unsafe_openssl.cnf\" $HOME/lib/nagios/plugins/check_{cmd} {args}")'
At this point you might paste the whole command to the site user’s shell, run the command and check both the command line output and the return value (contained in the variable $?).
Finally, paste the entire command to the text entry labeled Command line and save the rule:

The HTTPS BadSSL example 2 with the custom configuration is working now, example 1 can be removed – in real life you would probably have removed HTTPS BadSSL example 1 first and given the customized check the same name as the previously failed one.

Further thoughts
The example provided should work in most cases. If it does not work, we recommend trying to figure out a solution that works with the standard checks that are using OpenSSL 3.0. This might involve further changes to the configuration file and thus lead to the aforementioned multiple configuration files for differing problems. We would appreciate it if you publish your solutions in the Checkmk Forum. Please do not forget to specify the software or device version your configuration targets.
As you have learned, the active check simply means running a program that adheres to the specifications of the Monitoring Plug-ins project. If you have no success with changing the OpenSSL 3 configuration for the service you want to check, you are free to try installing a monitoring plug-ins package from other sources other than Checkmk. These will not interfere with those supplied by Checkmk.
Before doing so, please consider:
-
You might hide security issues that urgently need to be addressed.
-
Taking a lazy approach might prevent us from creating a proper archive of OpenSSL 3 configuration files for widely used software and devices.
You have been warned but still want to continue? The effort needed can vary greatly: Installation might be as easy as using a distribution supplied package. For example, Ubuntu 20.04 provides monitoring plug-ins 2.2 as a binary package linked against OpenSSL 1.1. Testing this combination is virtually no effort, so it might be worth giving it a try. On newer distributions, it can be necessary to compile both OpenSSL 1.1 and the monitoring plug-ins, which might require lots of compiler tweaking, source patching and thus tedious trial and error.
Conclusion
While it might be necessary to break compatibility sometimes for a few affected systems to achieve better security for the majority of systems, the open approach of Checkmk with its adherence to commonly used standards allows the creation of easy and target-oriented workarounds.
