Migrating check plug-ins to Checkmk 2.0
 on Mar 8, 2021
There are now nearly 2,000 official check plug-ins available as extensions for IT monitoring with Checkmk. However, the Check API is the same as it was when there were only a few plug-ins — and it hasn’t been updated since then. With Checkmk 2.0, we are now introducing a new Check API that restructures the check plug-ins to standardize and simplify their handling at various levels.
In addition, with the new product version we are switching from Python 2 to Python 3. This switch has nothing to do with the new Check API for now — but it does mean that you might have to look at your plug-ins’ code anyway.
While chances are good that porting existing Check plug-ins to the new Check API will work smoothly, the switch to Python 3 still requires you to look at your own plug-ins and whether you may need to make some adjustments. You can learn how to check if a plugin’s auto-migration will fail by looking in the werk #10601.
In this blog post, we will explain in detail how to migrate your self-written check plug-ins to the new Check API without any problems. The article is aimed at advanced users and is divided into three segments: ‘Preparing the code’, ‘Migrating the plug-in’ and ‘The Silver Bullet’.
Preparing the Code
First we deal with the porting from Python 2 to Python 3. There are already many tutorials on this on the web. For our case, the most important points are the ‘Division’ and the handling of ‘Text versus Binary Data’. Since str is Unicode under Python 3, the rule of thumb for the check plug-in code is to use str as often as possible. Since, as described in the documentation, division changes as of Python 3, you need to check the code to make sure that the calculated value is still of the desired type (float/int). This commit shows how to fix integer division in a check.
Clean up the code
Before we can start the actual migration, we first need to clean up the code and make it as ‘close’ to the new API as possible - but without actually porting it. To do this, add the required ‘import’ commands. That was previously unnecessary with the ‘old’ libraries, since Checkmk made sure that they were ‘magically’ available. With the new Check API, however, each user is responsible for ensuring that they import the required Python libraries on a regular basis.
At this point it is a good idea that you make these ‘magic’ imports explicit. By importing the Python libraries in the first step, you reduce false positives when using an IDE with an integrated linter or typechecker. This also allows you to better focus on potential issues during the actual migration.
This all becomes obsolete with the new API
As of Python 3, the iteritems method has been dropped. This also requires some adjustments to the plug-in code, more specifically replacing iteritems with items.
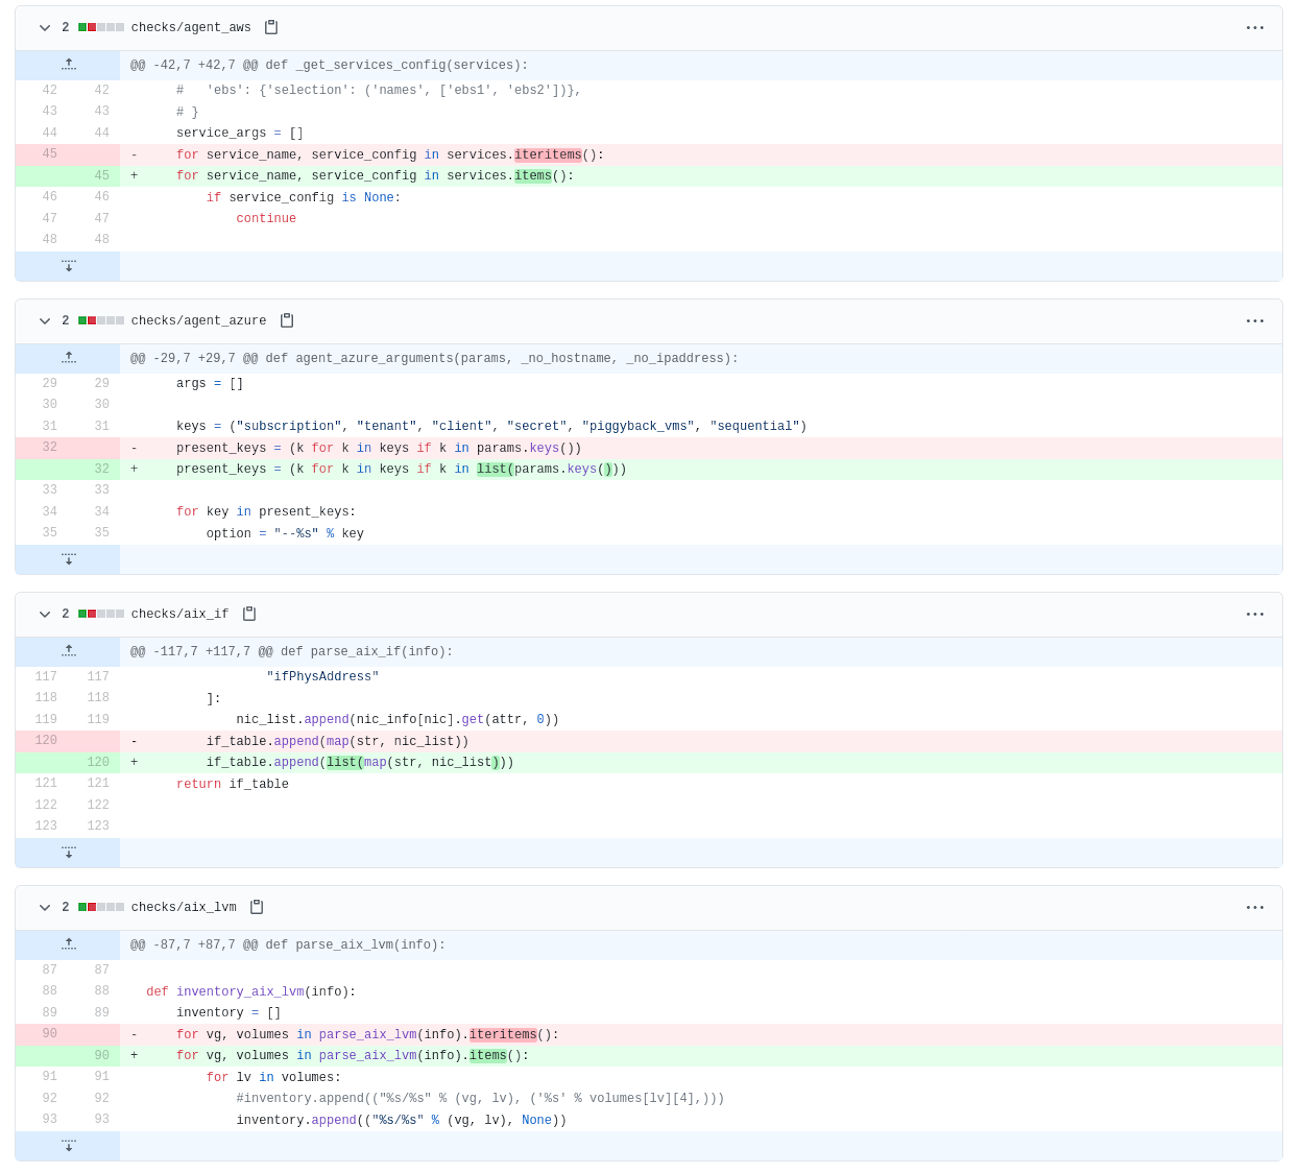
The two functions saveint() and savefloat() have also been dropped. In the past, saveint(x) returned the value 0 if x could not be converted to a number, for example because it was an empty string or did not consist only of digits. While this may be a useful action in some situations, it was used incorrectly in most cases, masking many errors. Now, if you want to get a 0 on an empty string — which in our experience is the most common usage of saveint(x) — simply code as follows:
foo = int(x) if x else 0
The same applies for savefloat().
A more prominent role for the parse function
With the new Check API, the parse function has a more prominent role. Therefore, you should always implement one if you haven’t already. This implementation is easy, as the commit introduce a parse function shows.

The parse function has the task of converting all raw data into usable data sets and to discard useless data.
In addition, it is helpful to put the check function into a suitable data structure. For example, if the item record is not found in the parsed sections, the check engine can generate a generic and consistent message.
If you make the key into an item, you can simply discover one service per key and search for the corresponding data in the check function as the commit 'parse data into a dictionary' shows.
The check and discovery functions must be generator functions
Note, however, that the check and discovery functions must be generator functions. This is mandatory in the new API. This was already possible in the old API, so we can change it here without any problems.
Furthermore, you have to consider that the parameters of the check function — if it has any — must always be a Dictionary. If this is currently not the case, you will need to adjust the implementation in the WATO rule chain accordingly.
As the last step of the migration preparation we now check if check_levels can be used.
While this has nothing to do with the migration itself, it is a useful helper function that can make your work easier. Many check plug-ins compare a (numeric) value with the defined threshold values to set a status. For this, you should always use the supplied check_levels function, which is available in both the old and the new API. In principle, we recommend to use as many of the API functions as possible to get a more uniform and standardized overall appearance.
With this, we have now completed the preparations and can move on to the actual migration.
Migrating the Plug-ins
When migrating a plug-in to the new Check API, consideration needs to be given to a few points that have changed compared to the old API. As mentioned earlier, the plug-ins are Python modules. The custom plug-ins will now be registered in the local/lib/check_mk/base/plugins/agent_based directory and will require the .py extension. You must in any case take this into account when storing the file. Many of the following explanations can be understood better by looking at this migration commit.
The new Check API now registers the sections and actual checks separately. Under the old API these were still grouped together under check_info.
Under the new API, the agent_section is the registration function. The user can learn all about this process and the capabilities of the agent_section in the API documentation. You define sections with either register.agent_section or register.snmp_sections, depending on the data source type. See the Sphinx documentation accessible over the help menu in your Checkmk instance for a list of all of the permitted arguments.

In the simplest case you will need only two arguments — the name of the section (this is usually the same as the plug-in’s name) and the parse function. Note that the variable name of your argument must be string_table.
SNMP detection replaces the SNMP scanning function
The old SNMP scan function is now called SNMP detection under the new Check API and it is a descriptive specification. For SNMP detection the user has to specify which single OIDs and search texts he needs and which SNMP range the SNMP check should pick up for monitoring. More information about this and according to which logic you have to rebuild the scan function can also be found in the Checkmk manual.
In addition, with supersedes there is now a separate option with which sections can exclude others. This is no longer done via the SNMP scan function.
We have also renamed the OIDBytes functions. This involves the following changes: OID_END becomes OIDEnd(), BINARY('2') becomes OIDBytes('2') and CACHED_OID('3') becomes OIDCached('3'). However, only the names have changed, the functionality remains the same. All other OID functions, such as OID_STRING, no longer exist with the new Check API. You need the three mentioned functions to specify the SNMPtree. While in the past you only had to specify a list, it is now necessary to use the SNMPTree class. More detailed information about this can be found in the Checkmk manual.
We have also renamed several function and argument names with the new Check API. For example, we now always speak consistently of Discovery when it comes to the discovery of services or host labels. Inventory will only be used for functions related to hardware and software inventory.
The discovery function and the check function — as already mentioned — must now also always work as generators, so you must use yield. Parameters can now also be added to the discovery function so that host_extra_conf is no longer necessary.
With the new API, the previous ‘include’ mechanism no longer exists. This now works via Python imports. Code that several plug-ins are to use can be stored in the directory local/lib/check_mk/base/plugins/agent_based/utils and can then be imported in the regular way by the plug-ins.
Pass ValueStore explicitly
The item_state function, which ensured that a value would persist over various checks, has also changed. The old API used the set_item_rate, get_rate and get_average functions for this. In their place, the new API now has the get_value_store function. It returns a so-called ‘mutable mapping’ — an object that can be used like a dictionary. Here each service gets its own individual object, so you don’t have to put the name of the check plug-in or the item in the key. This object (the ValueStore) has the task of taking over the persistent values.
get_average and get_rate still exist, but you have to explicitly pass the ValueStore to them. These used to share the function in the background. Under the new API, however, these are purely auxiliary functions without backend interaction, to which the ValueStore must be explicitly passed.
The previous error class MKCounterWrapped has also been given a new name. This used to make it possible to raise exceptions that cause a service to become ‘stale’. You can now achieve this behaviour by raising an exception of the type IgnoreResultsError or yield an IgnoreResults object.
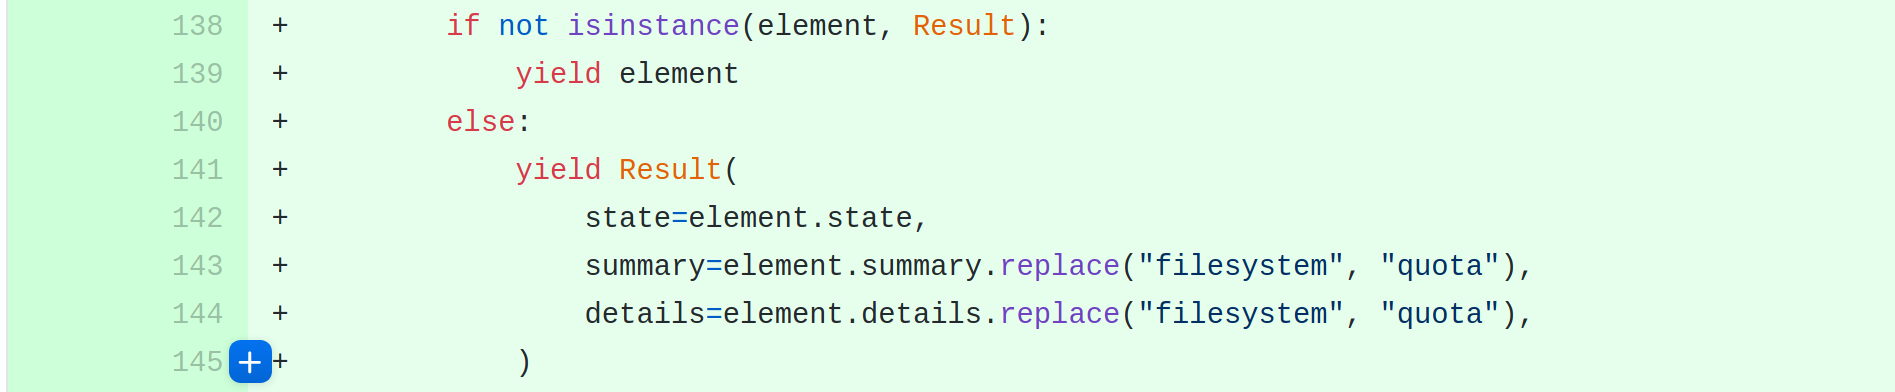
As can be read in the API documentation, the new Check API now returns the constants State.OK, State.WARN, State.CRIT, State.UNKOWN instead of magic return values, such as 2 for CRIT. This means that a result previously looked like this:
return 0, "All OK",[("foo",42)].
With the new API, the result now changes as follows:
yield Result(state=State.OK, summary="Everything OK")

yield Metric("foo",42)
If there are several results, Checkmk automatically takes the worst state.
In the documentation as well as in the Checkmk manual there is also a detailed explanation covering the former get_<type>_human_readable functions, which are now combined in a common render module.
The ‘Silver Bullet’
If you have followed all of the steps so far, your self-written plug-ins will already work under the new Check API. At this point, however, we would like to go into some more advanced topics — i.e. the 'silver bullet' in plug-in migration. This is primarily aimed at experienced users who may want to get even more out of their code.
Among other things, it is possible to use type definitions to make clear the intention of what type of value is expected in one’s code. These type hints ensure a clean code structure and make it possible to run a typechecker over the code and thus detect possible errors. In the Sphinx documentation, you can see the various type definitions used in the API under ‘Type annotations’. There you can also find all the information on the ‘Type Definitions’ module, which is particularly helpful when developing your own plug-ins.
The use of type definitions is not a must, but we do recommend it. This step is necessary at the latest when you want to mainline the code. In principle, if you decide to mainline your code, it must be covered with Unit Tests. Since the plug-ins are now regular modules, it is much easier to write Unit Tests. This also helps to code clean plug-ins.
Another point we would like to address at this point are cluster plug-ins. Under the old API, every plug-in could automatically be used on a cluster. This has now changed with the new API. If a plug-in is now supposed to work for a cluster, you have to explicitly implement a cluster function. The procedure for doing this can be easily understood in this commit about how to make a plug-in fit for clustering.
We hope that we have been able to answer all open questions about the migration of self-written plug-ins to the new Check API. You can also find more information on the new Check API in the Checkmk manual. If you still have open questions, you can also submit them to our Checkmk forum.
