Is a fully-fledged monitoring solution like Checkmk a bit of overkill just for monitoring Let’s Encrypt certificates? No way! Checkmk is easy to set up with its single package installation, has moderate hardware requirements and is easily extendable. Especially when you begin to notice that simple ‘uptime only’ dashboards no longer fulfill all of your requirements, you will be happy to add agent based monitoring to those hosts where it matters – and don’t have to switch monitoring solutions to do so.
Speaking of hardware requirements: Running as a sidecar application on a NAS with at least 4GB of RAM is possible as well as in a virtual machine (even if that is not running 24/7) or on a virtual or physical server. For this example installation, I choose a small Hetzner Cloud machine with 4GB of RAM and 2 Intel processors, located in Helsinki (where energy is cheaper and thus the whole machine is 4€/month). Make sure to choose a server with an Intel or AMD CPU (x86/64) since Checkmk does not yet offer installation packages for ARM. In case you are not running the Checkmk server around the clock (for example on your Linux desktop), you will be notified of state changes at startup, since the last known state will be stored upon shutdown.
Which Checkmk edition should I choose?
For smaller installations, Checkmk offers two editions:
- Checkmk Raw is 100% Open Source and for this reason free (as in speech and as in beer) for monitoring any number of services, and it is limited only by the capacity of the hardware you are running it on and the skills of the administrator to properly configure everything.
- Checkmk Cloud is one of the commercial editions and can be used for 30 days without limits. If you stay below 750 services, it will automatically change to the forever free tier after these 30 days.
Since Checkmk Cloud includes a more performant monitoring core (Checkmk Micro Core) and more comfort when setting up notifications, we recommend using Checkmk Cloud. If you are a die-hard Open Source aficionado, go with Checkmk Raw and calculate half an hour more for configuring its mail relaying. Switching editions later is possible with relatively low effort should you require more services or the more performant core.
Installation: straightforward
Head over to the download page, choose an edition and the Linux distribution you are running to generate the wget command line for the download:
wget https://download.checkmk.com/checkmk/2.3.0pXX/check-mk-raw-2.3.0pXX_0.distri_amd64.deb
Since the installation will pull some dependencies, make sure the package cache is up-to-date:
apt update

apt install ./check-mk-raw-2.3.0pXX_0.distri_amd64.deb
Here the leading dot-slash is necessary to instruct the apt to install from a local file, otherwise it would treat the argument as the name of a package to search in the cache.
Sites for the win
The installation of the package will not yet result in a working Checkmk server. Why? Checkmk uses the concept of sites. This allows you to run multiple Checkmk systems in parallel on one host. This feature can, for example, be used to run a production and a staging system in parallel or to test updates. When beginning with Checkmk, you can rest assured that you won't completely mess up your server: If you mess up a site, tear it down and start with a new site.
omd create my1stcheckmk
Now change to the site user…
omd su my1stcheckmk
Set the password…
cmk-passwd cmkadmin
And finally start the site…
omd start
Checkmk is now up and running, and you can change back to the root user again:
exit
One agent for localhost
For monitoring the health of the Checkmk server itself, we recommend at least installing and properly configuring a monitoring agent. Checkmk includes agent packages for most Linux distributions. These packages can be downloaded from within the Checkmk web interface. Instead of downloading and then again uploading, you can simply take the installation package from the file system:
find /opt/omd/ -name '*agent*.deb'
And install it (make sure you are the root user):
apt install /opt/omd/versions/2.3.0pXX.cre/share/check_mk/agents/check-mk-agent_2.3.0pXX-1_all.deb
Creating the first folder and host
Now head to the Checkmk GUI located at
http://hostname/sitename
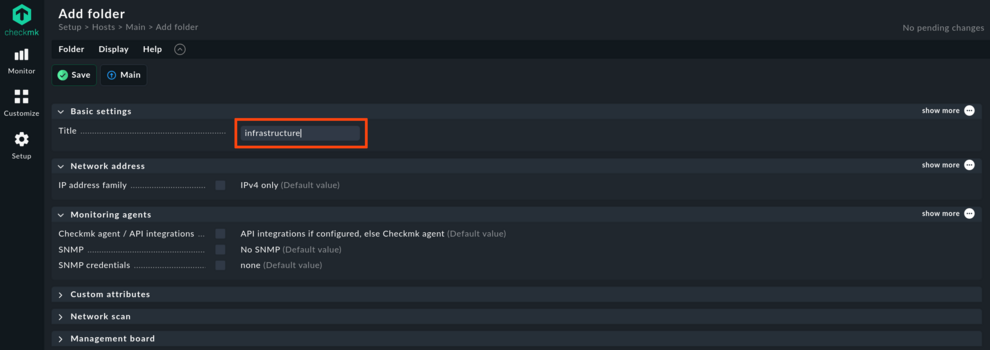
Login as cmkadmin with the password you just defined. Go to Setup > Hosts and create a first folder to contain the Checkmk server itself. I used infrastructure as folder name. In that folder, create a host localhost that uses the defaults. Click Save & run service discovery.
Note: In Checkmk you might use Help > Show inline help to read detailed information on the available options for each setting.
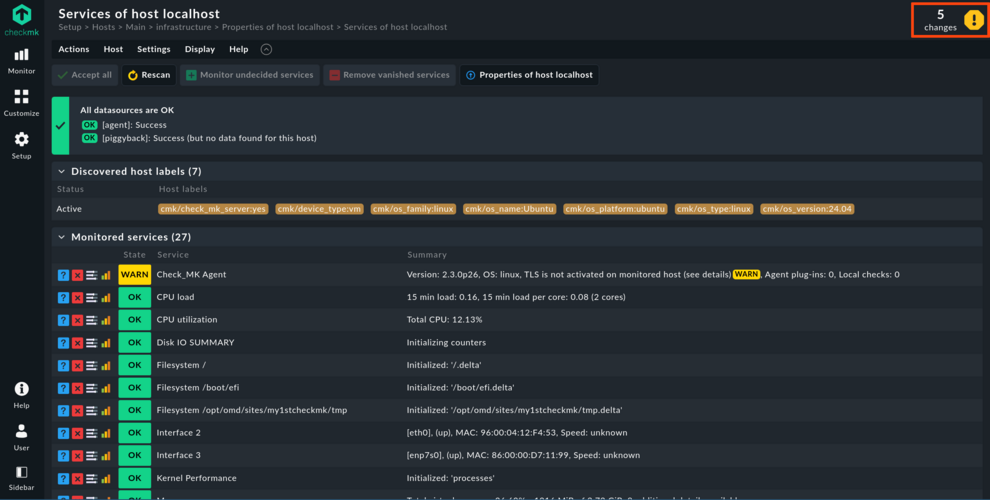
In the service discovery, you will usually have to click Accept all twice to confirm the services found. Now click on the yellow octagon indicating that some changes have not been activated. In Checkmk changes are not automatically activated upon saving to enable admins to Activate changes that may depend on each other.
You might have noticed that the Check_MK Agent service (yes, this one uses the old spelling) has the WARN state. This is because the communication between the Checkmk agent and server is not encrypted at this point. Go to a root shell one final time to enable mTLS by registering the agent to the site:
cmk-agent-ctl register --hostname localhost --server localhost --site my1stcheckmk --user cmkadmin

Attempting to register at localhost, port 8000. Server certificate details:

PEM-encoded certificate:
-----BEGIN CERTIFICATE-----
MIIFSDCCAzCgAwIBAgIUHG9nA6WWO8J6TySCuhF4LBWTCQEwDQYJKoZIhvcNAQEN
q5oZixF2aR7DVvTKz6W8d72wlaOmNTzmlxmBBeWc9keMCCuUD9jNPBKQ8oJg0R2v
1b9kYDypqoukSYZV
-----END CERTIFICATE-----

Issued by:
	Site 'my1stcheckmk' local CA
Issued to:
	my1stcheckmk
Validity:
	From Fri, 14 Feb 2025 16:35:36 +0000
	To   Wed, 14 Feb 2035 16:35:36 +0000

Do you want to establish this connection? [Y/n]
> y
After confirmation, in the Checkmk GUI it will take about one minute until the Check_MK Agent service changes from WARN to OK.
A folder for certificate monitoring
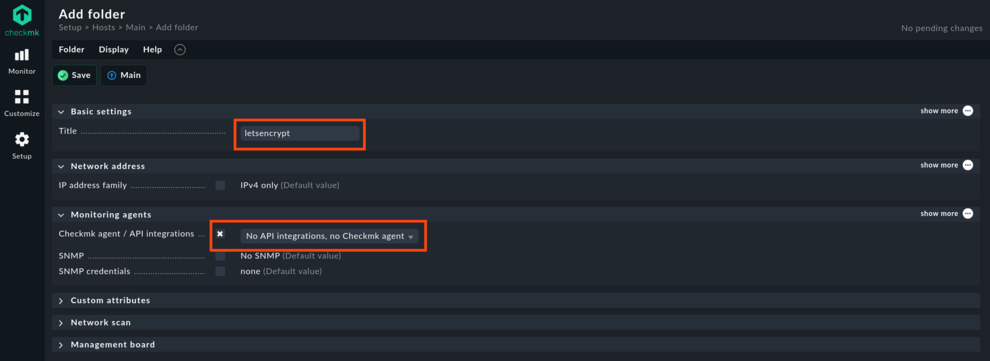
Checkmk uses a rules-based approach for configuring nearly everything. Criteria for rules can be folders, labels and how objects are named. For the certificate monitoring, it makes sense to create a folder letsencrypt, where all hosts that correspond to certificates will be placed. This time, take care with the details for the folder and set No API integrations, no Checkmk agent. This is the most direct way to define that all hosts in this folder are monitored only with active checks. Active checks are those checks that directly check an exposed service and not interpret agent output. So, no agent installation as done previously for localhost is needed for the hosts that will be placed into this folder.
As the next step, we recommend adding the hosts that should be checked: Navigate to Setup > Hosts, there open the new folder and click on the Hosts menu. Here you find an entry Import hosts via CSV file. With this you can either upload a CSV file or paste the contents of a CSV file into a text entry field. If you are only adding a dozen or so hosts, you might just type the hostnames, one per line into the field. Name the single column by typing ‘hostname’ in the first line:
hostname
docs.checkmk.com
checkmk.com
download.checkmk.com
play.checkmk.com
trust.checkmk.com
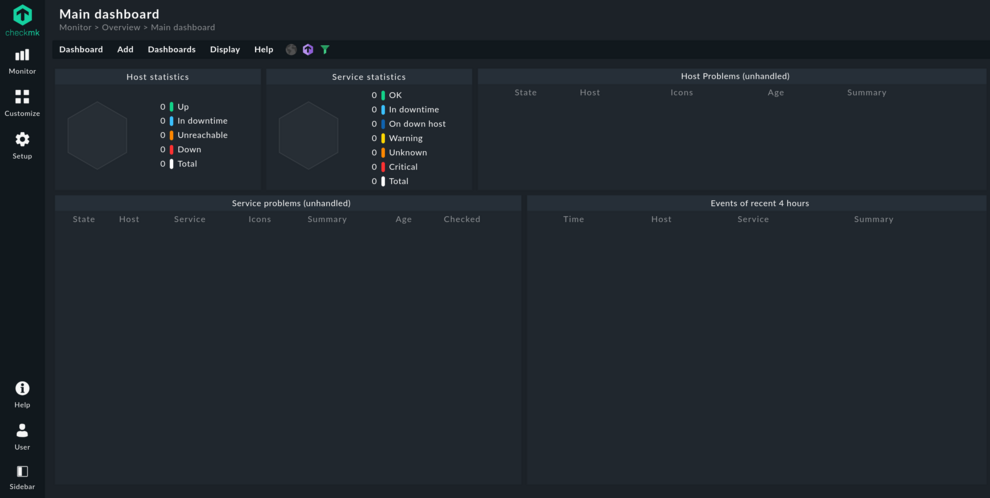
Of course the CSV can contain some more columns – see The official Checkmk User Guide for details. After uploading, you can verify once more. Finally import the hosts and do not forget to apply the changes when done. Clicking the Checkmk logo will bring you back to the main dashboard, now showing the total number of hosts. When clicking on one of the new hosts, you will notice that it does not yet have a service.
The power of rules
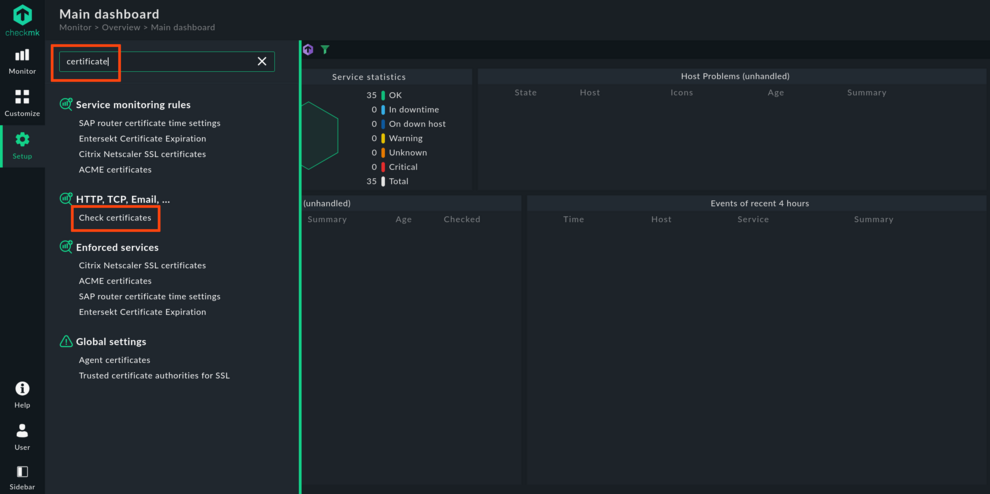
Now you can experience the full power of rules: Open the Setup menu and type ‘certificate' in the search field. Below HTTP, TCP, Email you will be presented with Check certificates. Click on this suggestion to edit/add rules.
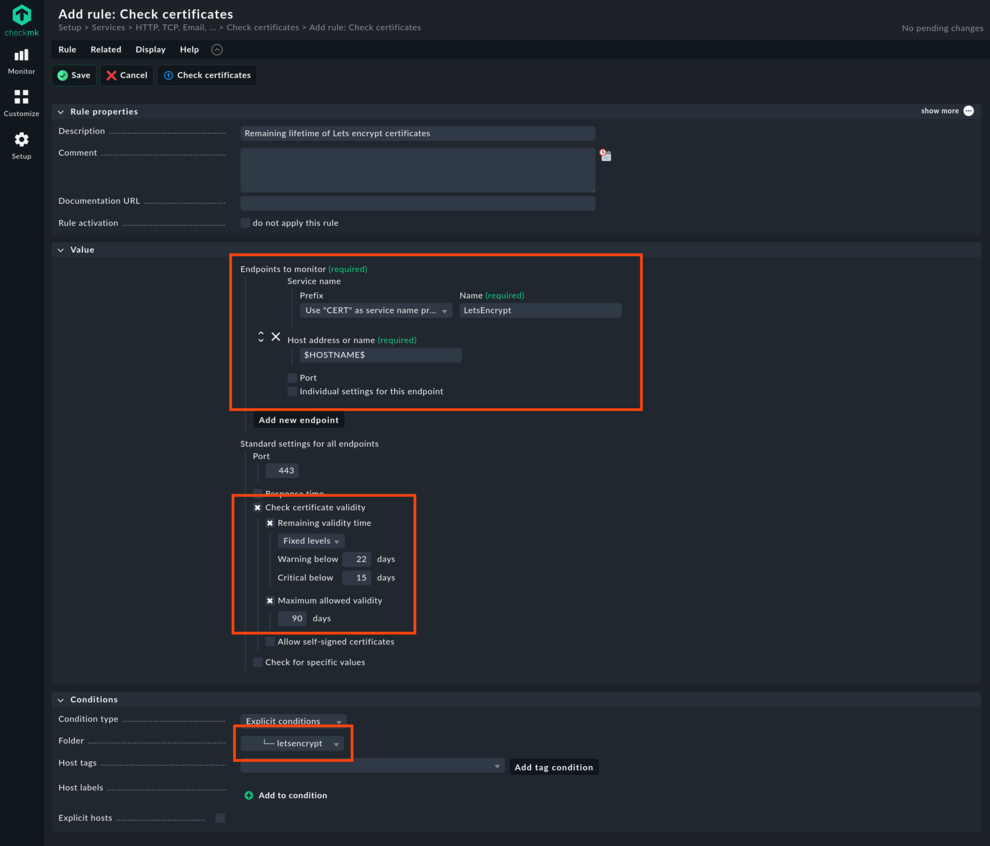
You can now add a new rule for the certificate checks. Follow the suggestions from the following screenshot regarding prefix, name and endpoint. Here we have created a warning at 22 days of remaining certificate lifetime. If you attempt to renew daily, you might use 28 days here. Finally, of most importance is the condition: Apply the rule to the newly created folder without any further limitation. This associates the rule with the parameters specified to each and any host in this folder.
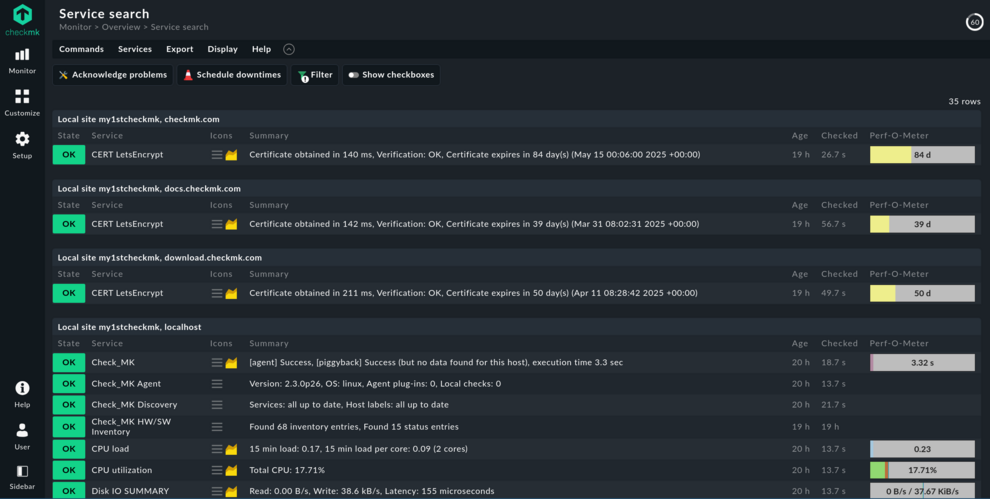
Apply the changes one more time and wait a few minutes until all hosts have been checked for the first time: Mission accomplished! Now a brief glance at the dashboard can show you whether there have been any problems renewing certificates.
No proper monitoring without notifications!
Of course, having to look at a dashboard to detect problems is not the smartest way for identifying issues. Proper notifications and alerting is really the way to go, and email still dominates notification methods. For this reason, it makes sense to begin with emails.
There is one significant difference between Checkmk Raw and Checkmk Cloud regarding email: Checkmk Raw relies entirely on the system MTA (‘mail transfer agent’), so as a minimum you will need to configure something like the relay-only Nullmailer. Alternatively, for HTML email Checkmk Cloud provides so-called ‘synchronous delivery’ which cuts out a local MTA and instead directly delivers to a smarthost. This is easier to configure and allows for better detection of failed email deliveries.
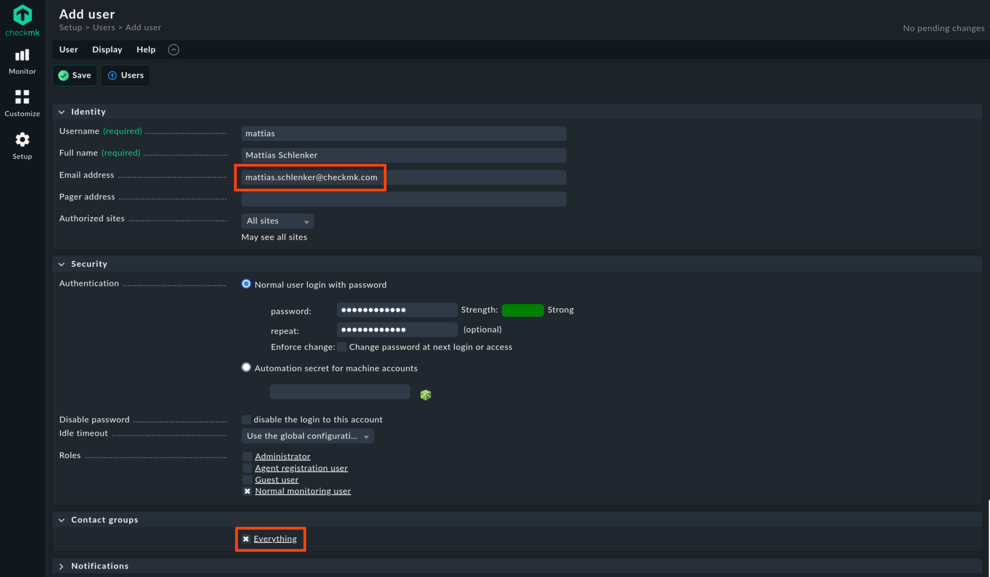
At this point we highly recommend creating a normal monitoring user that has an email address in order to separate administration tasks from monitoring tasks. Fill out at least a name, user name and email address, and then add this user to the Everything contact group. When your monitoring environment is getting larger, you may want to create dedicated contact groups for certain projects and remove the Everything contact group from all users.
For notifications, one default rule to notify all contacts of a host/service will already be enabled. Since you added the new user to the Everything group, they will be notified if a service changes to WARN or CRIT. Click on the pencil symbol to edit the default rule – you will almost certainly want to change the from field in the emails generated.
To check whether notifications actually arrive at their destination, go to Setup > Events > Notifications. There you will find a button Test notifications. Click it to select a host and a service, set the checkmark for HTML/ASCII and go for it. A few seconds later, you will be presented with a protocol showing who received the email and – of course – also find an email in your inbox.
What’s next?
As well as the check for certificates you have just learned to configure, you might want to check out the Check HTTP web service. This check can probe a whole range of HTTP-related parameters such as response code, content, redirects and response times. It can also perform basic certificate checking, so in simpler cases it can replace the certificate-only check. In more complicated cases like checking for a list of SNI (Server Name Indication), or checking on a protocol other than HTTPS, for example, the certificate check remains the check of choice.
Additionally, for monitoring disk space, hardware health, database performance and much more, you may want to add the Checkmk agent to more of your hosts. As you might have noticed, its defaults already provide some valuable insights on system load and disk utilization, and extending it is easy.
