How to configure SNMP on Linux
 on Jul 18, 2022
We have discussed SNMP (Simple Network Management Protocol) before and how it is not the right choice in most use cases. Despite the issues, lack of performance improvements of the protocol, and its growing list of alternatives, SNMP is leaving us not just yet. There are various reasons for this that go beyond the scope of this article. Suffice to say, SNMP is well-established and present on many networks to this day. Support from vendors is not dropping anytime soon either, forcing administrators to face configuring SNMP sooner or later (or rather, willingly or not).
Luckily, setting up SNMP on Linux is not a daunting task. Most of it consists of configuring SNMP, the daemon part, and learning a handful of commands, the tools part. Neither takes too long.
TL;DR:
The tutorial explains how to quickly and easily set up SNMP on Linux to monitor Linux systems.
- SNMP remains widely used and is still supported by most manufacturers — IT teams can hardly ignore it.
- The setup involves two main steps:
- Configure the SNMP service (daemon)
- Use essential SNMP commands (tools)
- The required effort is minimal — with just a few configurations and commands, SNMP runs reliably on Linux.
- Common uses of SNMP in Linux include network device performance monitoring, fault management through alerts, and configuration management.
What is the reference implementation for SNMP monitoring on Linux?
The reference implementation for SNMP monitoring on Linux is the package net-snmp. Dating back to 1992, net-snmp is available for all major Linux distributions. It supports all the versions of the SNMP protocol, with version 3 being the recommended one. It is actively developed, with multiple commits every month for many years.
The package is usually composed of two separate components: the tools to utilize the protocol, and the daemon to install it on a Linux host and to configure and monitor it. On Ubuntu and other Debian-based distributions, the tools are called snmp and the daemon snmpd. On Red Hat, the tools are in the net-snmp-utils package and the daemon in net-snmp. In other distributions, both components may be in the same package, generally simply net-snmp.
The daemon allows the local host to be monitored by an external host through SNMP, while tools do the reverse. Depending on your necessities for SNMP monitoring on Linux, it may be required to install both.
Alternatively to use a CLI tool, you can try Checkmk Trial to monitor your Linux Servers with deep insights, further than can be obtained through SNMP alone.
What are the differences between SNMP versions?
A short digression on the different versions of the protocol is necessary to configure SNMP on Linux. The original version of the SNMP protocol was v1, developed through the 1980s. It was later superseded by v2 that mainly offered an increased security and authentication mechanisms. v2 has two flavors, v2c and v2u. v2c offers a community-based security model, while v2u operates on a user-based SNMP security model (as specified in RFC1910). SNMP v3 further expands on this by allowing administrators to create and manage users with specific authentication and encryption settings.
SNMP v2u never really took off, but part of its features were used to develop v3. v2c is much more common and what we actually refer to when using “v2” throughout this article.
v3 is the latest version of the SNMP protocol, whose main difference is the added encryption support, with its pros and cons.
What is snmpd?
snmpd on Linux is the daemon part of net-snmp. When installed, it creates an SNMP host that can accept requests from another host and respond to them, issue notifications (TRAPs and INFORMs in SNMP parlance). With snmpd, administrators can gather data about system performance and status via SNMP. SNMP TRAPs are asynchronous notifications sent by the SNMP agent to a management station to alert administrators of specific events or conditions. The SNMP protocol allows for basic configuration of hosts and snmpd is needed to exploit these capabilities.
What are the tools for SNMP monitoring on Linux?
With snmpd being the daemon, the bulk of operations through SNMP are done with a series of tools in the snmp (Ubuntu/Debian) or net-snmp-utils package (Red Hat). These are the core of the SNMP implementation and what an administrator would routinely use to monitor a network with. These tools allow administrators to query, modify, and monitor various MIB objects defined within the SNMP framework. Additionally, these tools can be used to perform an SNMP poll to collect information from network devices.
Let’s have a look at how they work and what they are for.
snmptranslate
snmptranslate performs a translation of OID into the corresponding MIB name:
# snmptranslate .1.3.6.1.2.1.1.3.0 SNMPv2-MIB::sysUpTime.0Or the opposite, from a MIB to have the numeric OID:
# snmptranslate **-On** SNMPv2-MIB::sysUpTime.0 .1.3.6.1.2.1.1.3.0snmptranslate can also be used to explore the entire OID tree, helping administrators understand the structure and hierarchy of available MIB objects.
snmpget
snmpget retrieves data from an SNMP host. It makes a simple request that consists of three elements:
- where to retrieve information
- the administrative information associated with the request
- what information is required
As an example, a common metric retrieved using SNMP OIDs is system uptime, which can be accessed with the sysUpTime OID:
# snmpget -v 2c -c demopublic test.net-snmp.org SNMPv2-MIB::sysUpTime.0 SNMPv2-MIB::sysUpTime.0 = Timeticks: (586731977) 67 days, 21:48:39.77snmpget relies on community strings for authentication, and matching community strings between the client and SNMP agent is essential for successful data retrieval.
snmpgetnext
The other main operation of the SNMP protocol for retrieving information is GETNEXT, implemented by the snmpgetnext tool. It retrieves similar types of information as snmpget, but from the next OID. It is useful to walk through a series of SNMP hosts and progressively get information from each device. Its syntax is identical to snmpget:
# snmpgetnext -v 2c -c demopublic test.net-snmp.org sysUpTime
SNMPv2-MIB::sysUpTime.0 = Timeticks: (586978184) 67 days, 22:29:41.84
snmpwalk
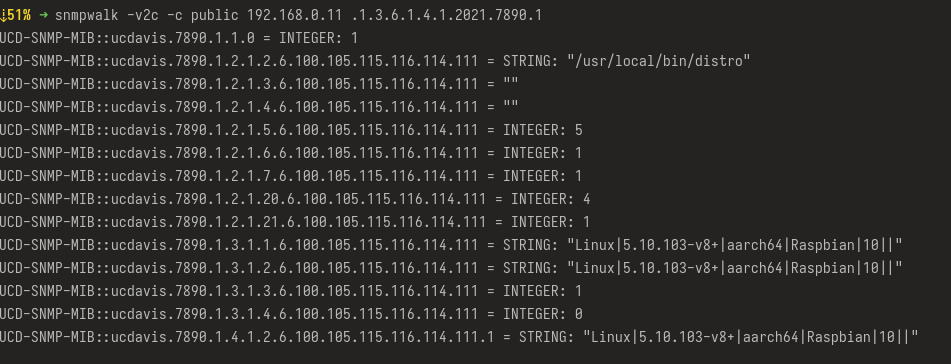
As a helper to walk a network, instead of launching snmpgetnext for each SNMP host, snmpwalk can be used to do it automatically.
You can use the following command to perform a walk through the SNMP tree:
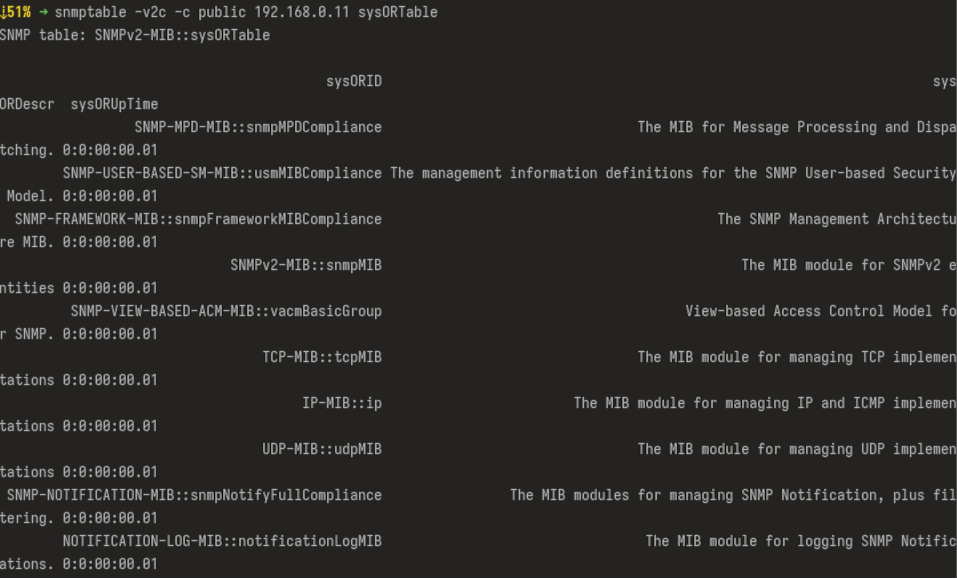
snmptable
snmptable returns the content of an SNMP table, displaying it one row at a time:
snmpset
The SET operation of the SNMP protocol is used to modify information of an SNMP host, update its configuration, or control its behavior. It is implemented in the snmpset tool. To use snmpset, the SNMP agent must be configured to allow read write access for the requesting client. SNMP agents can also be configured to provide read only access, which restricts clients to viewing information without making changes for enhanced security and proper management.
One of many possible examples is how to set a random string to be returned when queried:
$ snmpset -v 1 -c demopublic test.net-snmp.org ucdDemoPublicString.0 s "hi there!"$ snmpget -v 1 -c demopublic test.net-snmp.org ucdDemoPublicString.0 UCD-DEMO-MIB::ucdDemoPublicString.0 = "hi there!"snmpbulkget
The GETBULK operation available from SNMP v2 onward is implemented in the snmpbulkget tool. It is used to query a network of SNMP hosts rather than a single one.
$ snmpbulkget -v2c -Cn1 -Cr5 -Os -c public zeus system ifTableIt will retrieve the variable system.sysDescr.0 and the first 5 objects of the ifTable.
To retrieve multiple variables with a single command, snmpbulkwalk is a tool that allows you to run all the variables under a system:
$ snmpbulkwalk -v2c -Os -c public zeus systemsnmptrap
TRAPs are generally sent by SNMP agents to signal abnormal conditions to a management station (in our case, a Linux server). To actually generate TRAPs yourself, the snmptrap tool is available. For v2/v3 the syntax is:
$ snmptrap -v 2c -c public host "" UCD-NOTIFICATION-TEST-MIB::demoNotif \ SNMPv2-MIB::sysLocation.0 s "Just here"When sending SNMP traps, the specified SNMP community is used to authenticate the trap with the receiving management station.
Substitute 2c with v3 when communicating with an SNMP v3 agent.
How to install the SNMP daemon and utilities on Linux?
To get started with SNMP on your Linux system, you first need to install the Net-SNMP package, which provides the essential SNMP daemon and utilities. Installing SNMP packages requires sudo privileges to ensure you have the necessary permissions to modify system files. On Debian-based distributions such as Ubuntu, you can install the SNMP daemon and utilities using the following command:
sudo apt-get install snmpd snmpIf you are using a Red Hat-based distribution like CentOS, use the following command instead:
sudo yum install net-snmp net-snmp-utilsAfter installation, you will have all the necessary components to configure SNMP, monitor your Linux host, and respond to SNMP requests. Completing these installation and configuration steps will enable SNMP on your Linux system. The snmp packages are widely supported and regularly updated, making them a reliable choice for enabling SNMP on your Linux devices.
How to begin the configuration of the SNMP daemon and network access?
We have seen what is available in net-snmp to use SNMP for monitoring Linux servers. Now, we need to take a look at how to configure SNMP on Linux.
The SNMP daemon's configuration file usually resides at /etc/snmp/snmpd.conf for v1 and v2 of the SNMP protocol. If v3 is going to be used, as recommended, additional configuration is located at /var/lib/net-snmp/snmpd.conf. This file does not save changes while the daemon is running, so the daemon needs to be stopped before modifying the file.
Both files come heavily commented to facilitate configuring SNMP on Linux. To enable SNMP access, you need to add specific configuration lines to the following file, /etc/snmp/snmpd.conf, to define security settings, community strings, and access permissions. For example, to set the system location and control access, you might add the following lines:
syslocation "Data Center Rack 3"   # system location
rocommunity public                 # read-only community string
By default, SNMP only allows connections from the local computer or local machine. To permit connections originating from remote devices, you must modify the configuration line in the daemon's configuration file to allow external access.
Once the SNMP daemon is properly configured, the snmpd service will be able to respond to SNMP requests as expected. Commands to simplify configuring SNMP on Linux exist to ease network and system administrators’ work.
Before you start to configure SNMP on Linux, ensure you have the firewall configured to allow SNMP traffic. snmpd uses by default UDP port 161. With iptables, open it with:
$ iptables -A INPUT -s <ip addr> -p udp -m udp --dport 161 -j ACCEPT $ iptables -A OUTPUT -p udp -m udp --sport 161 -j ACCEPTFor firewalld, the command is:
$ firewall-cmd --permanent --add-port=161/udpThis is for running snmpd on a host and allowing it to be queried. If you only want to monitor an external host, it is sufficient to ensure that the host is reachable.
Configure SNMP on Linux (v1 and v2)
The first two versions of the protocol provide simple authentication using a community string. It is a shared secret that is passed in clear text or hashed over the network, in a plainly unsafe way. This string has to be set up before communicating between SNMP hosts and devices.
The directive rocommunity or rwcommunity in the snmpd.conf file declare this string:
community [source [OID]]While community is the used string, source is an IP address or subnet, and OID is an SNMP tree to provide access to. That’s basically all that is needed to communicate through SNMP between hosts.
It is recommended to add a location and contact info to the snmpd.conf file in order to inform other nodes on the network of where this SNMP host is located and who is responsible for it. Add a couple of lines after community:
syslocation Somewhere (In the World)
syscontact Admin <admin@somewhere.com>
Restart the snmpd daemon with systemctl restart snmpd and the Linux SNMP host is ready to answer SNMP requests.
Configure SNMP on Linux (v3)
Configuring snmpd on Linux with the latest version of the protocol is slightly more complex than with the previous ones. To start, the configuration files are now two: not just /etc/snmp/snmpd.conf, but also /var/lib/net-snmp/snmpd.conf. Luckily, the net-snmp package comes with a command helper, net-snmp-create-v3-user, to configure the user under which the SNMP Linux server will run.
Make sure to stop the daemon and create the SNMP user with the following example:
$ net-snmp-create-v3-user
Enter a SNMPv3 user name to create:
admin
Enter authentication pass-phrase:
yourpassphraseofchoice
Enter encryption pass-phrase:
  [press return to reuse the authentication pass-phrase]

  adding the following line to /var/lib/net-snmp/snmpd.conf:
     createUser admin MD5 "yourpassphraseofchoice" DES
  adding the following line to /etc/snmp/snmpd.conf:
     rwuser admin
The final rwuser directive has a similar format to the community above:
user [noauth|auth|priv] [OID]user is a username and OID is the tree to provide access to. By default, in v3 the snmpd daemon allows only authenticated requests (auth), while the noauth allows any and the priv option enforces encryption. The strings can be combined. Our recommended option for maximum security is authpriv that specifies that requests must be authenticated and replies encrypted.
To improve the not-so-high default level of security of snmpd, a few options to the net-snmp-create-v3-user can be added:
-a SHA: uses the more modern SHA hashing algorithm instead of MD5.-x AES: uses AES encryption instead of the deprecated DES.
Both options should be set as they switch the communication and authentication steps to more secure protocols. Unfortunately, neither is up to modern standards and SNMP is not a choice for a modern organization that wants to monitor hosts and devices in a secure, private, and efficient setting.
How to troubleshoot common Linux SNMP issues?
If you encounter problems with your SNMP configuration, there are several steps you can take to diagnose and resolve common issues:
Check the status of the SNMP service to ensure it is running correctly:
sudo systemctl status snmpdReview your /etc/snmp/snmpd.conf configuration file for syntax errors or missing directives. Even a small typo can prevent the SNMP daemon from starting or responding to requests.
Test SNMP connectivity using the snmpwalk command. This command helps verify that your SNMP service is accessible and responding as expected:`
snmpwalk -v 2c -c mycommunitystring 127.0.0.1Replace mycommunitystring with your actual community string.
Check system logs for any error messages related to the SNMP service. This can provide valuable clues if the SNMP daemon fails to start or encounters issues:
sudo journalctl -u snmpdBy systematically checking the SNMP service status, configuration file, connectivity, and logs, you can quickly identify and resolve most SNMP configuration issues on your Linux host.
What are the best practices for configuring SNMP?
To maintain a secure and efficient SNMP configuration on your Linux servers, consider the following best practices:
- Always use a strong, unique community string and restrict SNMP access to trusted hosts or specific IP addresses to minimize unauthorized access.
- A non-standard SNMP port, such as 1161 instead of the default 161, can help reduce simple automated scans. However, it should only be considered an additional measure. Access restrictions, firewall rules, and SNMPv3 remain the primary security controls.
- Whenever possible, use SNMP version 3, which offers enhanced security features like user authentication and encryption, protecting your SNMP data from interception and tampering. The bigger packet size and overhead may cause performance issues on very busy or large networks though.
- Limit SNMP access to only the necessary parts of the OID tree, reducing the amount of exposed system information and minimizing the attack surface.
- Keep your net-snmp package (or alternative for your Linux distribution) up to date to benefit from the latest security patches and improvements.
- Regularly monitor SNMP traffic and review logs for unusual activity or unauthorized SNMP requests, helping you detect and respond to potential security threats.
- Use a centralized monitoring solution to manage and monitor multiple SNMP-enabled devices efficiently, ensuring consistent SNMP configuration and oversight across your network.
- Review and understand the default snmpd configuration, especially when working with multiple VRFs or network contexts, to ensure SNMP operates correctly in both default and specific VRF scenarios
By following these best practices, you can configure SNMP on your Linux hosts in a way that balances functionality with security, ensuring reliable monitoring while protecting your systems from common SNMP-related vulnerabilities.
Configuring SNMP on Linux isn’t hard…but is it worth it?
SNMP configuration is indeed not the hardest one out there. Yet, it is still another piece of software to handle, in the case of snmpd, or to master, in the case of the various tools coming with net-snmp. And who monitors the monitor? Especially when it is installed on devices from a vendor. It is another risk of failure that can be avoided. Especially when supporting a probably soon-to-be-fully-outdated protocol.
With alternatives aplenty and major vendors moving on from SNMP, it seems unnecessary to go through the trouble of setting it up alongside modern monitoring tools. We definitely do not recommend using it when it can be avoided.
But often it is not a decision that can be made: whether because the infrastructure is already existing or because a few hosts can only support SNMP, sometimes we are forced to use SNMP. For a little while longer, it will definitely stay with us. And luckily, from a Linux host point of view, configuring it is definitely not complicated.
SNMP has plenty of learning materials to help the clueless administrator get started in configuring a SNMP Linux host. This article included.
FAQ
Why does modifying /var/lib/net-snmp/snmpd.conf require stopping the daemon first?
Unlike the primary configuration file (/etc/snmp/snmpd.conf), which is read-only during runtime, the /var/lib/net-snmp/snmpd.conf file is dynamically managed by the active Net-SNMP daemon to store persistent state data, such as SNMPv3 cryptographic engineIDs and localized security keys. When the snmpd daemon terminates or restarts, it automatically flushes its current operational state from memory and overwrites this file. If you attempt to make manual edits or add users while the daemon is running, your modifications will be completely wiped out and replaced by the daemon's internal memory state upon the next service shutdown. Stopping the service first ensures your manual entries are preserved and properly processed during the subsequent boot cycle.
What is the difference between an SNMP TRAP and an SNMP INFORM?
Both are asynchronous notifications sent by an SNMP agent to a management station to report specific infrastructure events. The key difference lies in transmission reliability. TRAPs are unacknowledged notifications; the agent sends the packet via UDP and receives no confirmation, meaning alerts can be silently lost if the network is unstable. Conversely, INFORMs require the receiving management station to send back an acknowledgment receipt. If the sending agent does not receive this confirmation, it will automatically retry the transmission, making INFORMs much more reliable for critical alerts.
Can I monitor hardware performance like CPU and RAM usage via SNMP on Linux?
Yes. While basic SNMP configurations are often used just to poll general system uptime, Net-SNMP can track comprehensive hardware and system performance. The Net-SNMP daemon natively collects real-time physical metrics from the host's operating system (such as CPU load averages, physical memory allocation, swap utilization, and disk space) and exposes them through standard Object Identifiers (OIDs), specifically within the UCD-SNMP-MIB extension. This allows any standard monitoring platform to easily query and collect these metrics.
Does the Linux SNMP daemon support IPv6 networks?
Yes, Net-SNMP natively supports IPv6, and virtually all modern Linux distributions include this support by default in their pre-compiled packages. However, the daemon is often configured out-of-the-box to listen only on IPv4 (udp:161). To enable IPv6 monitoring, you need to update the agentaddress directive in your /etc/snmp/snmpd.conf file to include IPv6 transport specifiers, such as udp6:161. Once updated, the daemon will handle requests and notifications over both protocols simultaneously.
How to verify which SNMP versions and security settings are enabled on a Linux server?
Because the SNMP daemon (snmpd) does not openly broadcast its security profiles or active versions upon network connection, the most reliable method is to check its runtime configuration files directly on the host. Administrators can inspect /etc/snmp/snmpd.conf to see which access directives are uncommented: the presence of rocommunity or rwcommunity indicates that SNMPv1/v2c is enabled, while createUser, or rwuser directives confirm that SNMPv3 User-based Security Model (USM) is active. Additionally, you can check the service configuration via systemd to see if specific listening flags restrict protocol behavior.
