Monitoring Oracle databases with Checkmk
 on Dec 12, 2022
Note: The content on this page uses the former names of Checkmk editions. Checkmk Enterprise is now Checkmk Pro, Checkmk Raw is now Checkmk Community.
Monitoring databases is important to ensure that applications function securely and perform optimally. Oracle Database (or Oracle for short) is one of the world's leading providers of database management systems (DBMS) for relational databases. Monitoring Oracle SQL is therefore one of the core tasks for many IT teams.
In this tutorial, I will show how you can implement Checkmk for monitoring Oracle databases with just a few minutes work. I will go through all of the necessary steps with you using an example environment. You don't need any previous experience with Oracle monitoring, as Checkmk takes over the collection of the most important monitoring services and also sets threshold values for warnings and critical states.
If instead you are looking for general information on monitoring databases, without reference to Checkmk, I would recommend this article on SQL server monitoring. You can also find an overview article on server monitoring here.
TL;DR:
The tutorial shows how to monitor Oracle databases with Checkmk in just a few minutes – without special prior knowledge in Oracle monitoring.
- Checkmk automatically detects the most important Oracle monitoring services and sets meaningful thresholds for warning and critical alerts.
- All setup steps are explained using an example environment, so you can quickly put the monitoring into productive use.
General requirements for Oracle monitoring tools
Many users monitor Oracle and other databases with Checkmk because it combines scalability and flexibility with easy configuration. Checkmk comes with 27 monitoring checks for Oracle and is thus able to automatically collect a wide range of monitoring data. In addition, advanced users can create and integrate their own SQL queries (Custom SQLs). An overview and further details of the Oracle plug-ins can be found in the catalog of check plug-ins.
Checkmk also supports the monitoring of all common operating systems (Linux, AIX, Solaris, HP-UX and Windows). The Checkmk agents automatically include all important services to ensure optimal performance of the servers’ operating system.
In addition to monitoring Oracle application performance, Checkmk supports the monitoring of hardware servers and cloud providers such as AWS or Microsoft Azure. In the same way you can also monitor virtualization platforms such as VMware or Proxmox. Checkmk additionally supports the monitoring of databases in the Oracle Cloud Infrastructure (OCI). This holistic approach is important since problems with hardware and cloud servers, as well as virtualization platforms, can lead to problems with your database and therefore these should also be included in the monitoring.
In this tutorial, I will therefore not only go into the monitoring of the Oracle database, but also show you how to monitor the operating system and the server hardware. Thanks to its predefined, practical specifications for threshold values and numerous automation features, it only takes a few minutes to set up in Checkmk.
Prerequisites for monitoring Oracle with Checkmk
You will need a Checkmk site with which you can query the monitoring data from your Oracle instances. If you don't already have a Checkmk environment running, you can get started right away with the Checkmk Trial. Follow this video tutorial and your Checkmk site will be ready to go within minutes.
Of course, you also need an Oracle database that you want to monitor. For this database, you also need the rights to create new database user accounts. In my case, my Oracle database version 19.0 runs on a hardware server, and I use Rocky Linux version 8.0 as my operating system.
I also monitor another Oracle instance where I don't have access to the hardware and operating system. This would be the case, for example, if you are using services such as the Oracle Database Service for Azure. In this Oracle monitoring tutorial, you use Checkmk's Agent Bakery to configure the Oracle monitoring plug-in. This prevents syntax errors and saves time. The Agent Bakery is a feature in Checkmk Enterprise and is therefore included in the Checkmk Trial. If, on the other hand, you use Checkmk Raw, you will instead need to configure the plug-in via the command line. To do this, follow the instructions in the article on monitoring Oracle databases in the Checkmk documentation.
Step 1: Configuring access accounts for Oracle monitoring
In order for Checkmk to be able to retrieve data from Oracle, you must create a user account with read rights for each database to be monitored. If you use a Real Application Cluster (RAC), it is sufficient to create the user account only once. However, you will later need to install and configure the Checkmk agent including the agent plug-in on each node of the Oracle cluster.
The procedure differs depending on which Oracle environment you are using. However, you can read more details about this in the Oracle documentation. For my Oracle site on my local server, for example, I log in via the command line with SQL Plus, of course you can also use another tool.
In my example, I switch to the Oracle user for this and log in as sysdba. Such a high-level authorization is not a must, but you do need an account with sufficient rights for the creation of a new user account.
su - oracle
sqlplus / as sysdba
Here you now create the user account for Checkmk. In my case, I have called it ‘monitoring’.
create user monitoring identified by myPassword
After creating the user account, assign access rights and the rights to start a session to this user account.
grant select_catalog_role to monitoring

grant create session to monitoring
You can now test the connection with connect:
connect monitoring/myPassword
In my case, access has been successful. Here ‘myPassword’ is only a placeholder. You should always use a strong password with sufficient length and a mixture of upper and lower case letters, numbers and special characters.

The monitoring needs an account for each Oracle database, so create a user account for each database site. In this example, I repeat the process for my other Oracle site. I recommend always using the same login data for each database. This will make it easier for you to configure the Oracle monitoring rule later in Checkmk.
Step 2: Configuring Oracle monitoring rules in Checkmk
Now switch to your Checkmk site to prepare the Oracle agent plug-in, which you will later install on your Oracle server. To do this, use the ‘Oracle databases’ agent rule.
- Search for ‘oracle database’ under Setup. Click on ‘ORACLE databases (Linux, Solaris, AIX, Windows)’.
- Click on Add rule.
You will now see many setting options. Since Checkmk already has good default settings, you will only need to activate a few of the options.
- You can skip Rule Properties, as you do not need to make any changes here. These options are mainly for adding additional information for this specific rule.
- You do the configuration under ORACLE databases (Linux, Solaris, AIX, Windows):
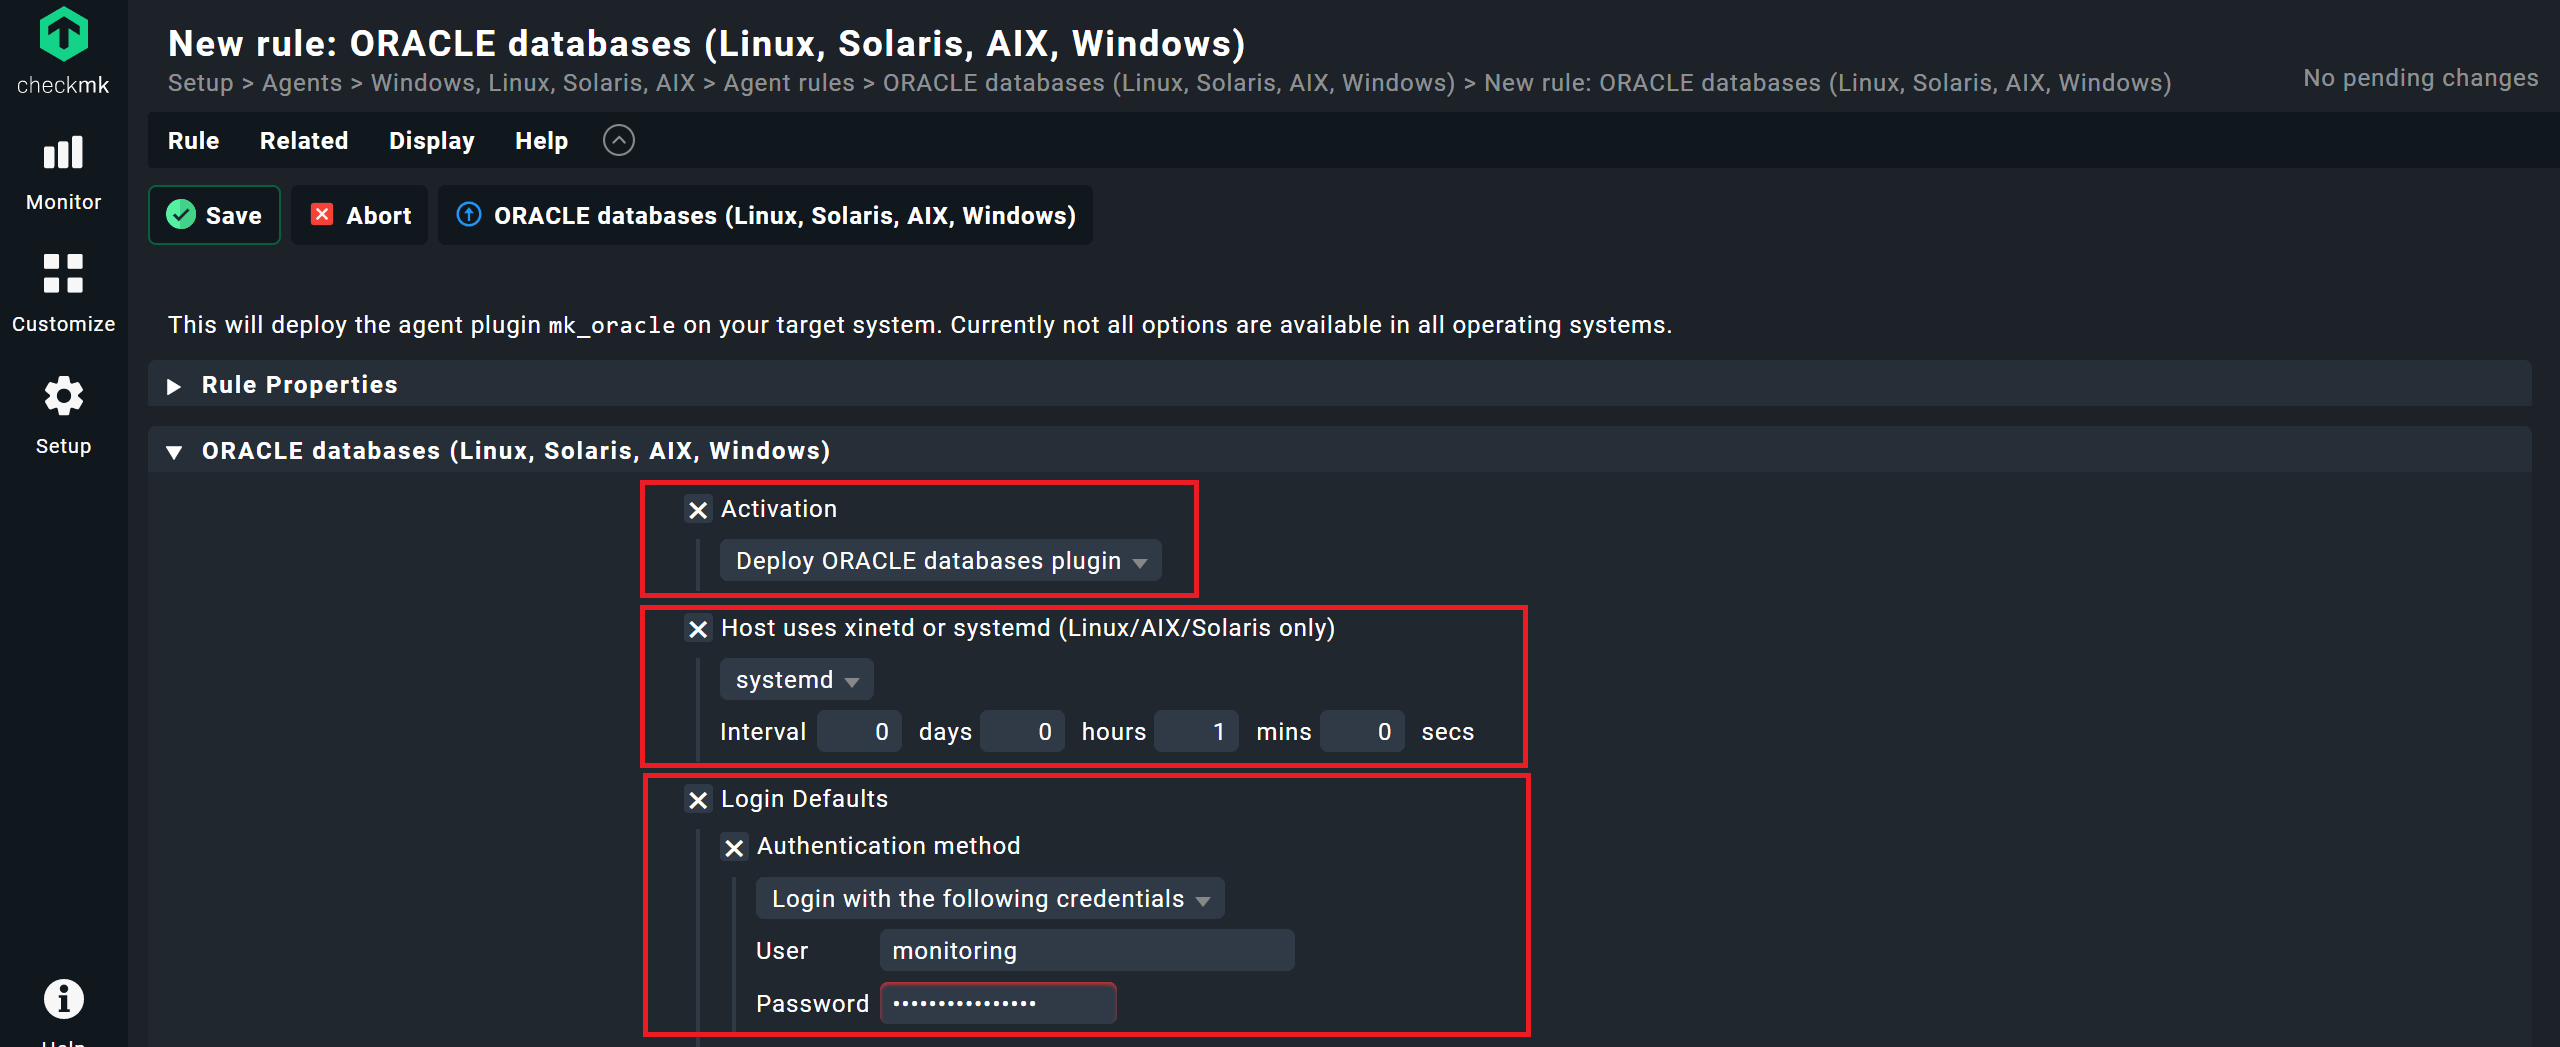
- Select the checkbox for Activation and leave the default setting as ‘Deploy ORACLE database plugin’.
- On Linux systems, Checkmk assumes by default that your Oracle server uses
xinetdas a super server daemon. You have to edit the Host uses xinetd or systemd (Linux/AIX/Solaris only) option if your database host server is set tosystemd, as in my case. You can leave Interval at one minute. - Activate Login Defaults. You will then see a number of login options.
- Activate Authentication method to log in via a normal user account. Retain the default setting ‘Login with the following credentials’.
- Add the user account, in my case ‘monitoring’, to User, followed by the corresponding password to Password.
In most cases, no further configurations are necessary for access. In my example, the rule is as follows.
Under Conditions you do not need to alter any other settings, as agent rules apply to the configuration of the agent package and not to the monitoring hosts.
- Save the rule with Save.
With this, the agent rule has now been configured. Checkmk comes supplied with practical default settings. In the next step, you will bake and install the agent. Nevertheless, in the next part, I would like to explain the other functions of the Oracle monitoring rule. With these you can customize your Oracle monitoring if needed, but in this tutorial you do not need these options. If you do not require any customization, you can proceed directly to the packaging of the agents.
Configuration options for access to Oracle databases
The first seven configuration points under ORACLE databases (Linux, Solaris, AIX, Windows) deal with Checkmk's access to your database.
The most important item is Login Defaults, as here you decide how Checkmk logs on to the Oracle database to be monitored. Under Authentication method, you can use an Oracle Wallet to log in as an alternative to a user account. For more details on working with an Oracle Wallet, see the Oracle documentation or the Checkmk documentation.
By default, Checkmk uses a normal user account to retrieve data from the Oracle database. With login as role you can customize this and instead define Checkmk as sysdba, sysdg or sysoper as role.
The Hostname or IPv4 address for listener option defines the address of the Oracle instance. By default, the agent listens on localhost, but you can change this here if necessary. If you have changed the default Oracle port, you must also change this under TCP port for listener.
If you want to use a Transparent Network Substrate (TNS) alias for access to Oracle, you must store it at TNS Alias (Linux/AIX/Solaris only) in Checkmk.
If you want to customize the login data for a specific SID, you can use the Login for selected databases option. Then you can add the individual SIDs here.
If you want to monitor Oracle's Automatic Storage Management (ASM), you must create a separate user account for Checkmk. You should then store this account under Login for ASM Instances to monitor, otherwise Checkmk cannot collect any monitoring data from ASM.
If you want to exclude certain SIDs from the monitoring, you will find a number of options under Instances to monitor. This can be useful for developers' test systems, for example.
Configuration options for Oracle monitoring
The other options under ORACLE databases (Linux, Solaris, AIX, Windows) revolve around the contents of the monitoring. With Sections - data to collect you decide what Checkmk should monitor for you. You can remove or edit individual sections here, but this is usually not necessary. Checkmk monitors all metrics by default, only TS Quotas (not used) is deactivated by default.
The developer team of Checkmk has also optimized the caching for the plug-in and modified the default setting so that it delivers the best results for most applications. In the areas where asynchronous operation makes sense, this has been pre-set. With the Exclude some sections on certain instances, Cache age for background checks and Sqlnet Send timeout options, you can configure the caching even further. Details on the Oracle plug-in can be found in this Werk. You can of course customize the plug-in configurations according to your own requirements via the monitoring rule.
The Remote instances (Linux/AIX/Solaris only) option is important for monitoring remote databases, for example in the Oracle Cloud Infrastructure.
You need the ORACLE_HOME to use for remote access (Linux/AIX/Solaris only) option to modify the environment variable in ‘ORACLE_HOME’ for access to the remote database.
Checkmk assumes that you store the ‘sqlnet.ora’ and ‘tnsnames.ora’ configuration files under /etc/check_mk. With TNS_ADMIN to use for sqlnet.ora and tnsnames.ora (Linux/AIX/Solaris only) you can customize the file path for the TNS-ADMIN.
Step 3: Baking agent packages for Oracle servers
Once you have configured the agent rule, creating the agent package is easy. Switch to the Agent Bakery and bake the agent.
- Go to Setup -> Windows, Linux, Solaris, AIX.
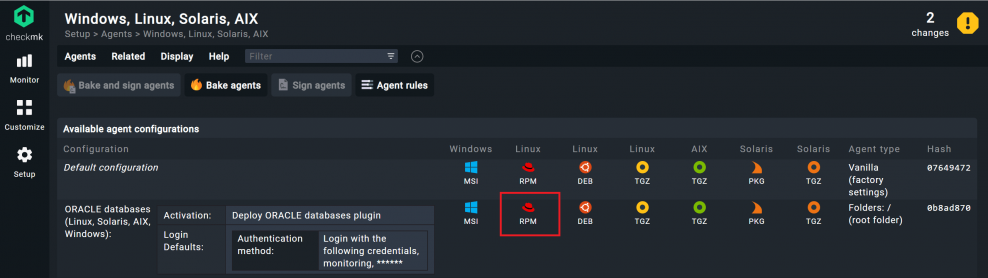
- The button with the flame symbol and the 'Bake agents' caption should be colored orange and thus ready to bake. Click on it.

Wait briefly until the baked agent appears. Next, click on the agent that matches your database server's operating system. For me, this would be the RPM package.
If you use Oracle databases on multiple servers with differing access data, you will need to configure the Oracle database rule multiple times and bake multiple agents. If you change your Oracle server from a server operating system with xinetd to one with systemd, you will usually have to modify the corresponding option and also bake a new agent.
Otherwise, it is sufficient to create one agent for a number of databases that use different operating systems if you use the same access data and the same monitoring parameters for all Oracle databases.
Installing the agent on the database server
Now, install the Checkmk agents on your database servers. The precise steps to do this depend on your database environment. In my example, I downloaded the package to my Oracle server and installed it via terminal using dnf:
sudo dnf install check-mk-agent-2.1.0p14-0b8ad87002c9f414.noarch.rpm
Red Hat recommends using dnf, depending on which RHEL version you are using, and you can also use yum to install the Checkmk agent.
Following an installation, I recommend activating TLS encryption. To do this, you must register the agent. You will find the steps for doing this in the chapter on the Linux agent or the Windows agent in the Checkmk documentation.
Step 4: Monitoring Oracle servers with Checkmk
If the agent runs together with the Oracle plug-in on the Oracle server, you can include it in the monitoring. I recommend using a folder structure in Checkmk, as this simplifies the administration of the hosts in the monitoring. For this reason, you should first create a folder for your Oracle databases.
- Go to Setup -> All hosts, click on Add folder and enter a name of your choice under Title. I have named the folder ‘oracle’.
- Click on Save.
- Then open this folder by clicking on it.
- Click Add Host to create a host in this folder.
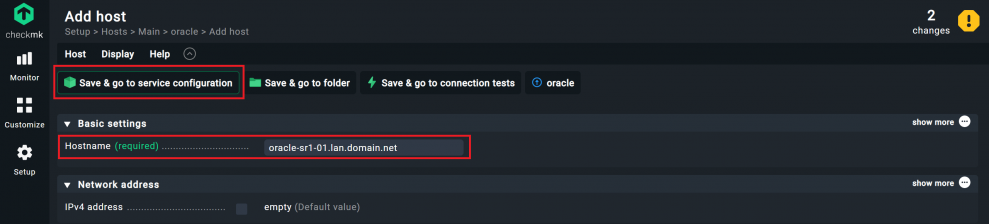
- Under Hostname, enter the name of your Oracle server. In this tutorial, my Oracle server is called ‘oracle-sr1-01.lan.domain.net’.
- If the host name is not resolvable by DNS, you must activate the IPv4 address option and enter the server's IP address. This is not required for me.
- Click on Save & go to service configuration.
I recommend the use of fully qualified DNS names (FQDN) as the standard for host names in your entire infrastructure. This instruction for a consistent naming concept will help you with the implementation.
- Wait for the automatic service detection and accept all detected monitoring services with Accept all.
- To see your database server as the host, activate the changes in Checkmk. Click on the yellow icon with the exclamation mark in the top right corner. You should see the number of ‘changes’ there.
- Click Activate on selected sites.
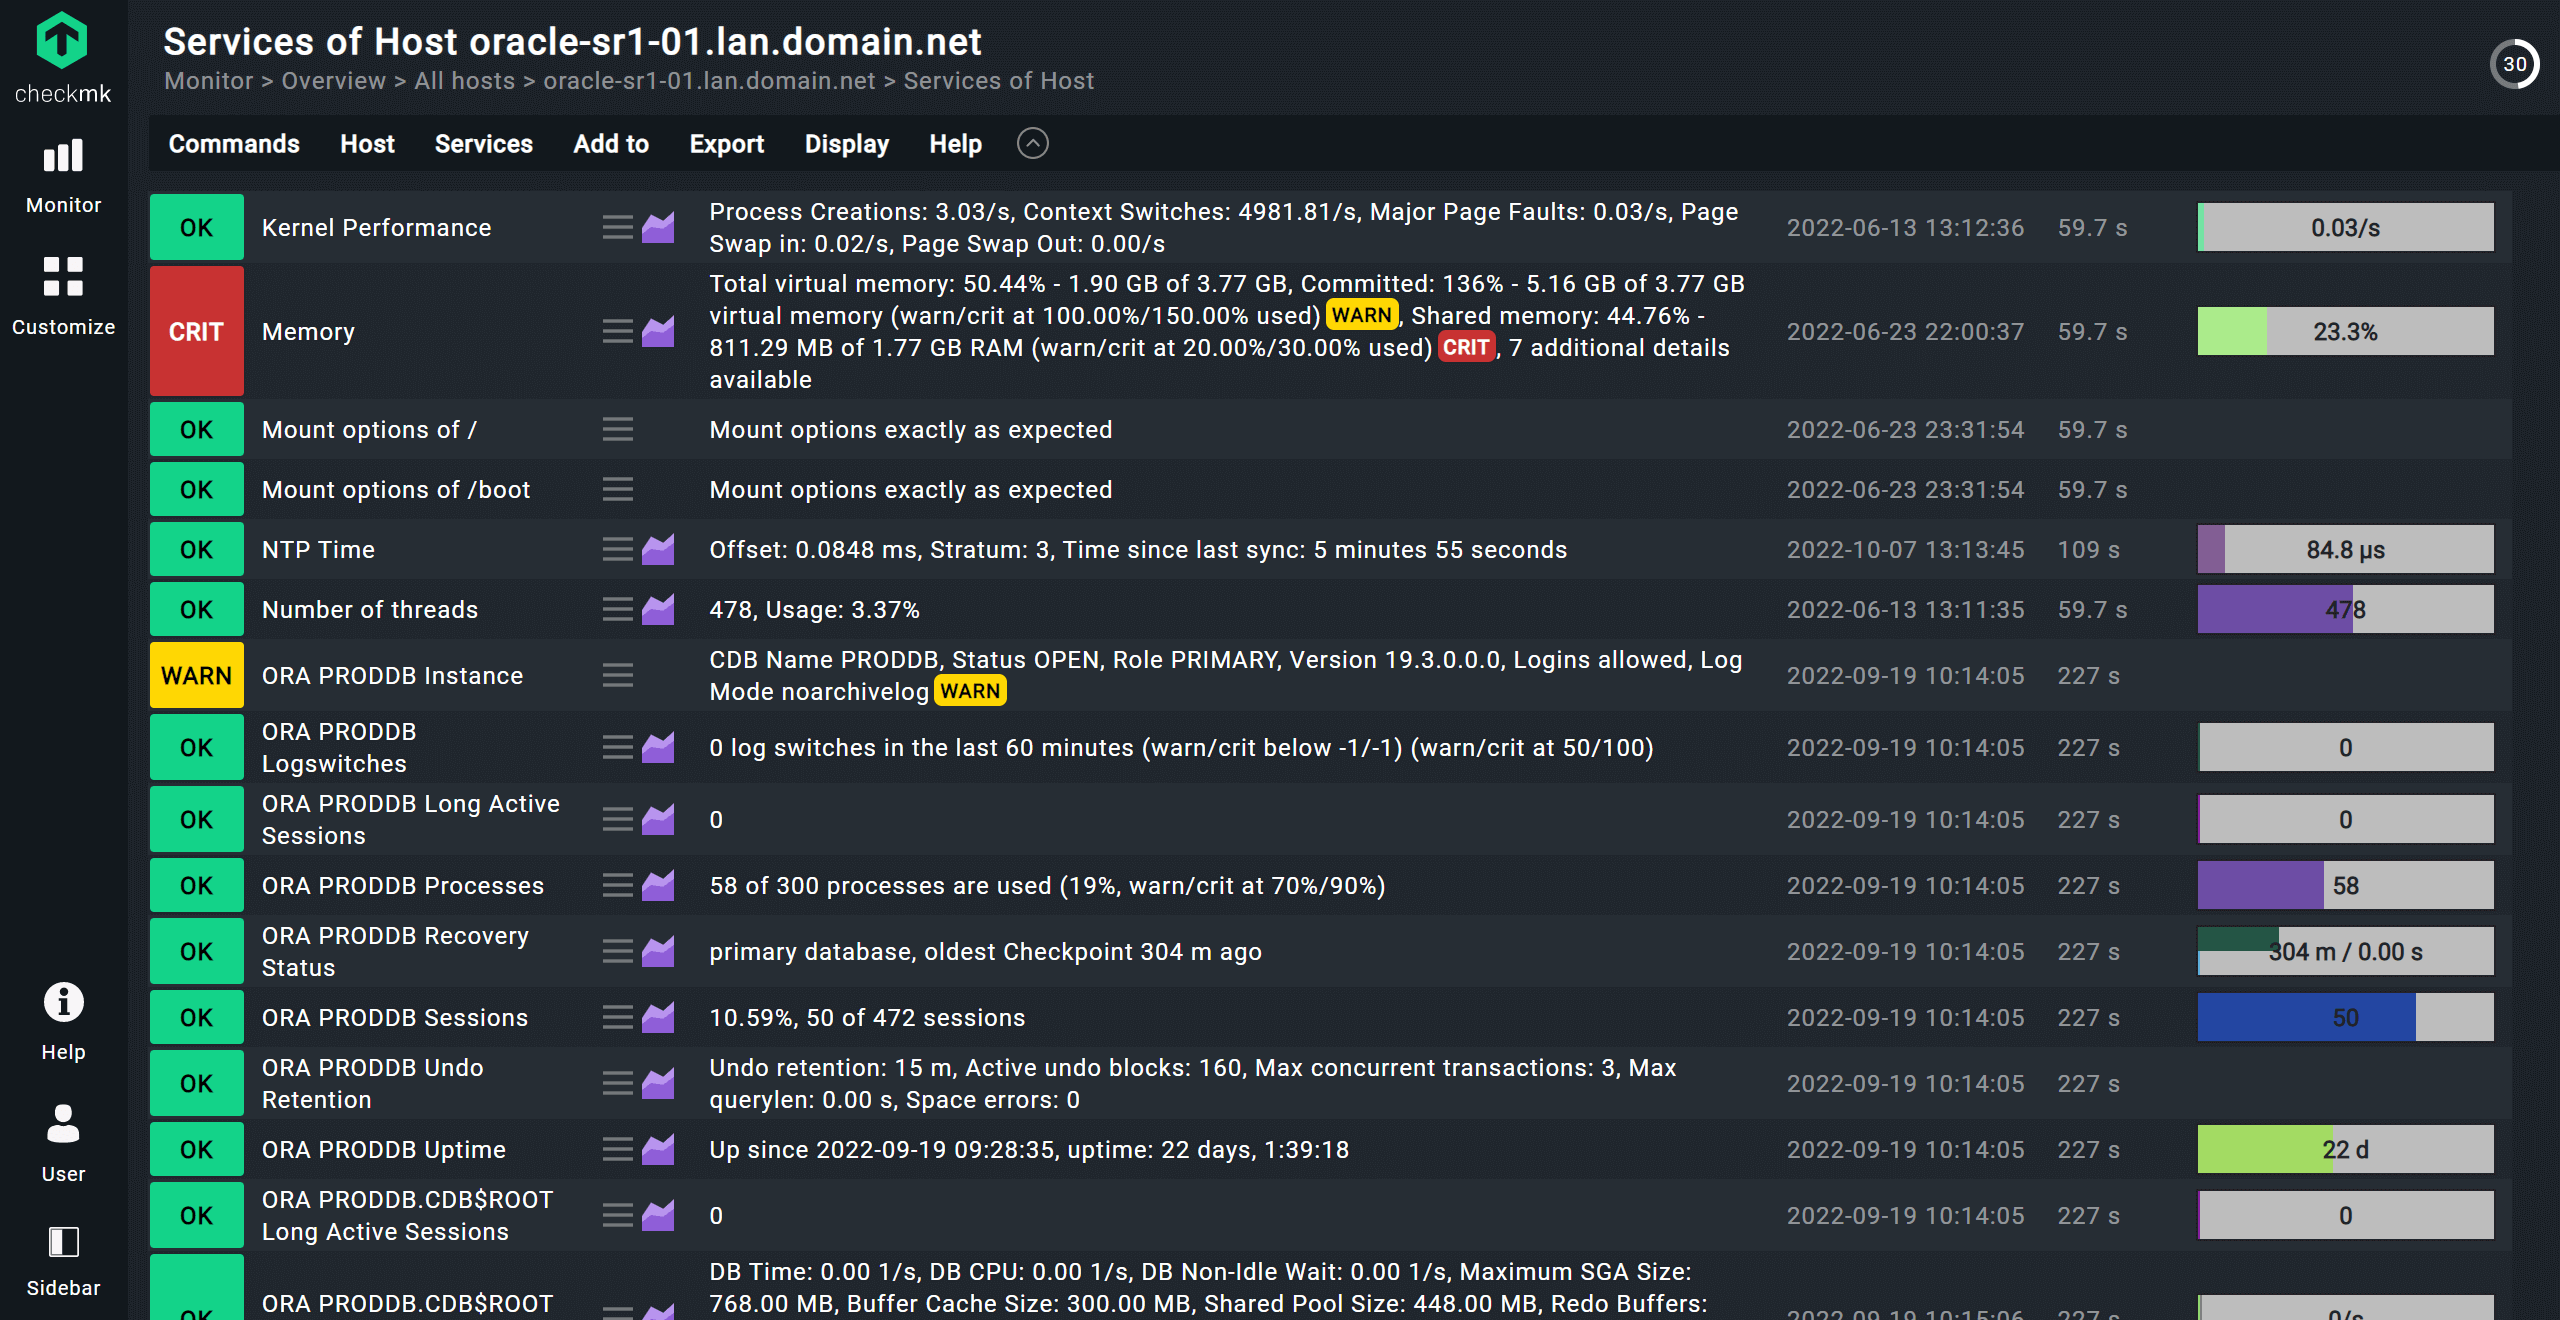
- The first Oracle database is now in the monitoring. You can find the host under Monitor -> All Hosts.
In my particular example, Checkmk has detected numerous services. Thanks to the predefined thresholds, Checkmk also warns me that my main memory could be overused (136% committed) and that this database uses a high proportion of the shared main memory (44.76%). Here this is acceptable, however, as I only use a fairly small amount of working memory for my test system.
Step 5: Hardware monitoring via IPMI
You now have the Oracle Application Performance and the operating system in the monitoring. If you use a hardware server with a management board, you should also include this as a separate host in the monitoring. You could theoretically also add the hardware services to the already existing host, but this has a negative effect on performance in the long term, so I would advise against it.
Adding the services is easy since Checkmk again recognizes them automatically. Here I use IPMI to transfer the monitoring data.
- Go to Setup -> All hosts and reopen your Oracle folder.
- Click on Add host.
- Under Hostname, enter a name for your management board. I have named it ‘oracle-iLO-sr1-01.lan.domain.net’.
- Click on Save & go to folder.
If your server management board's host name is not resolvable by DNS, you will need to enter an IP address manually under IPv4 address.

- Now search for IPMI under Setup and select ‘IPMI Sensors via Freeipmi or IPMItool’.
- Click on ‘Add rule’.
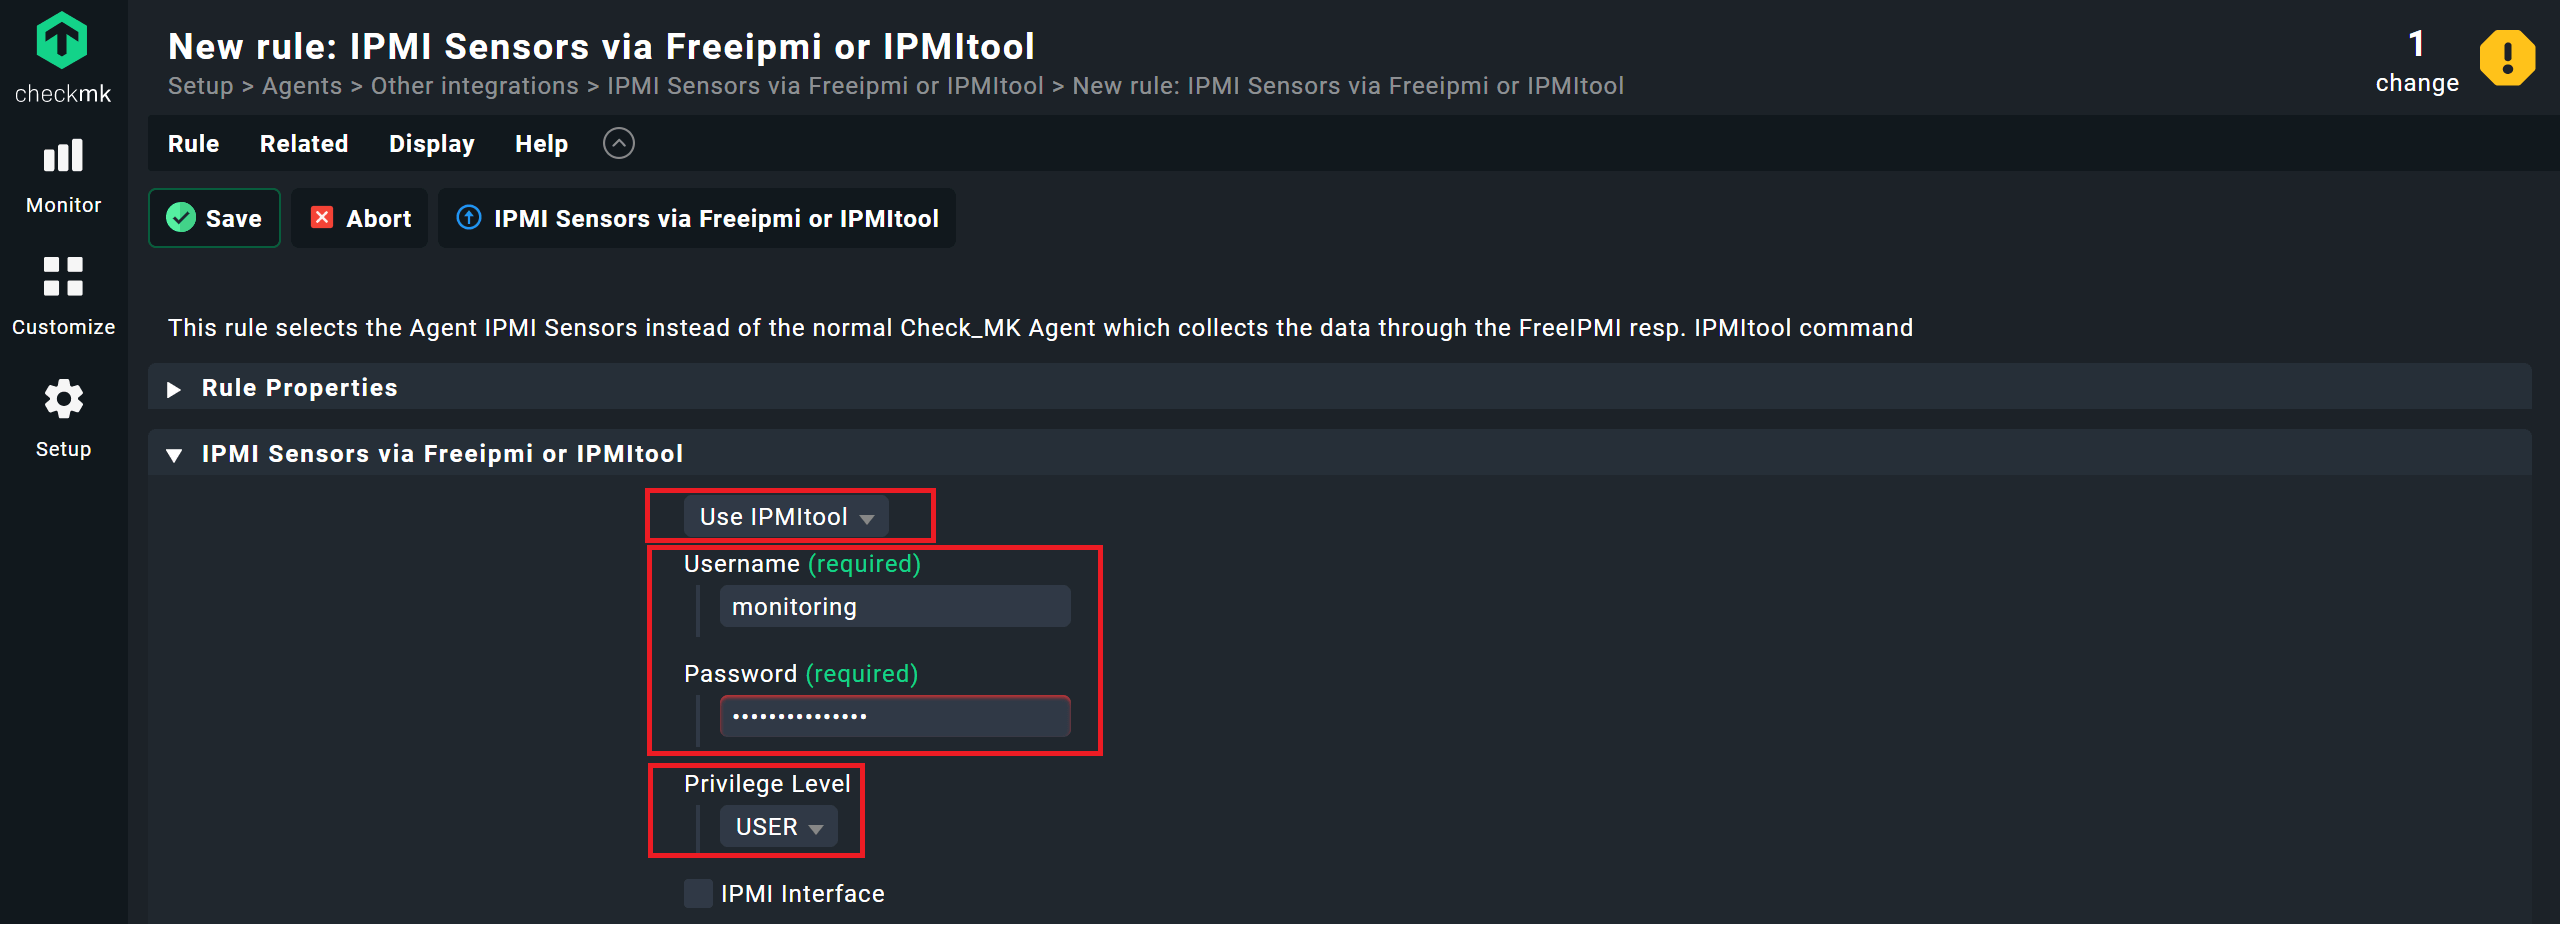
- Select the IPMI tool of your choice under IPMI Sensors via Freeipmi or IPMItool. I use ‘Use IPMItool’.
- Add the IPMI access data to Username and Password. For me that is ‘monitoring’ and ‘mypassword’.
- Under Privilege Level select ‘USER’.
- Once you have finished the configuration, click on Save.
- Under Conditions, activate the Explicit hosts option and apply this rule to your management board host. Here I have used ‘oracle-iLO-sr1-01.lan.domain.net’.

- Go to Setup -> Hosts. You should now see your databases' hosts and the hardware server.
- At your management board host, click on the yellow icon for automatic server detection, the third icon on the right.

- If you once again accept the ‘changes’ with Activate on selected sites, you will have added the Management Board to the monitoring.
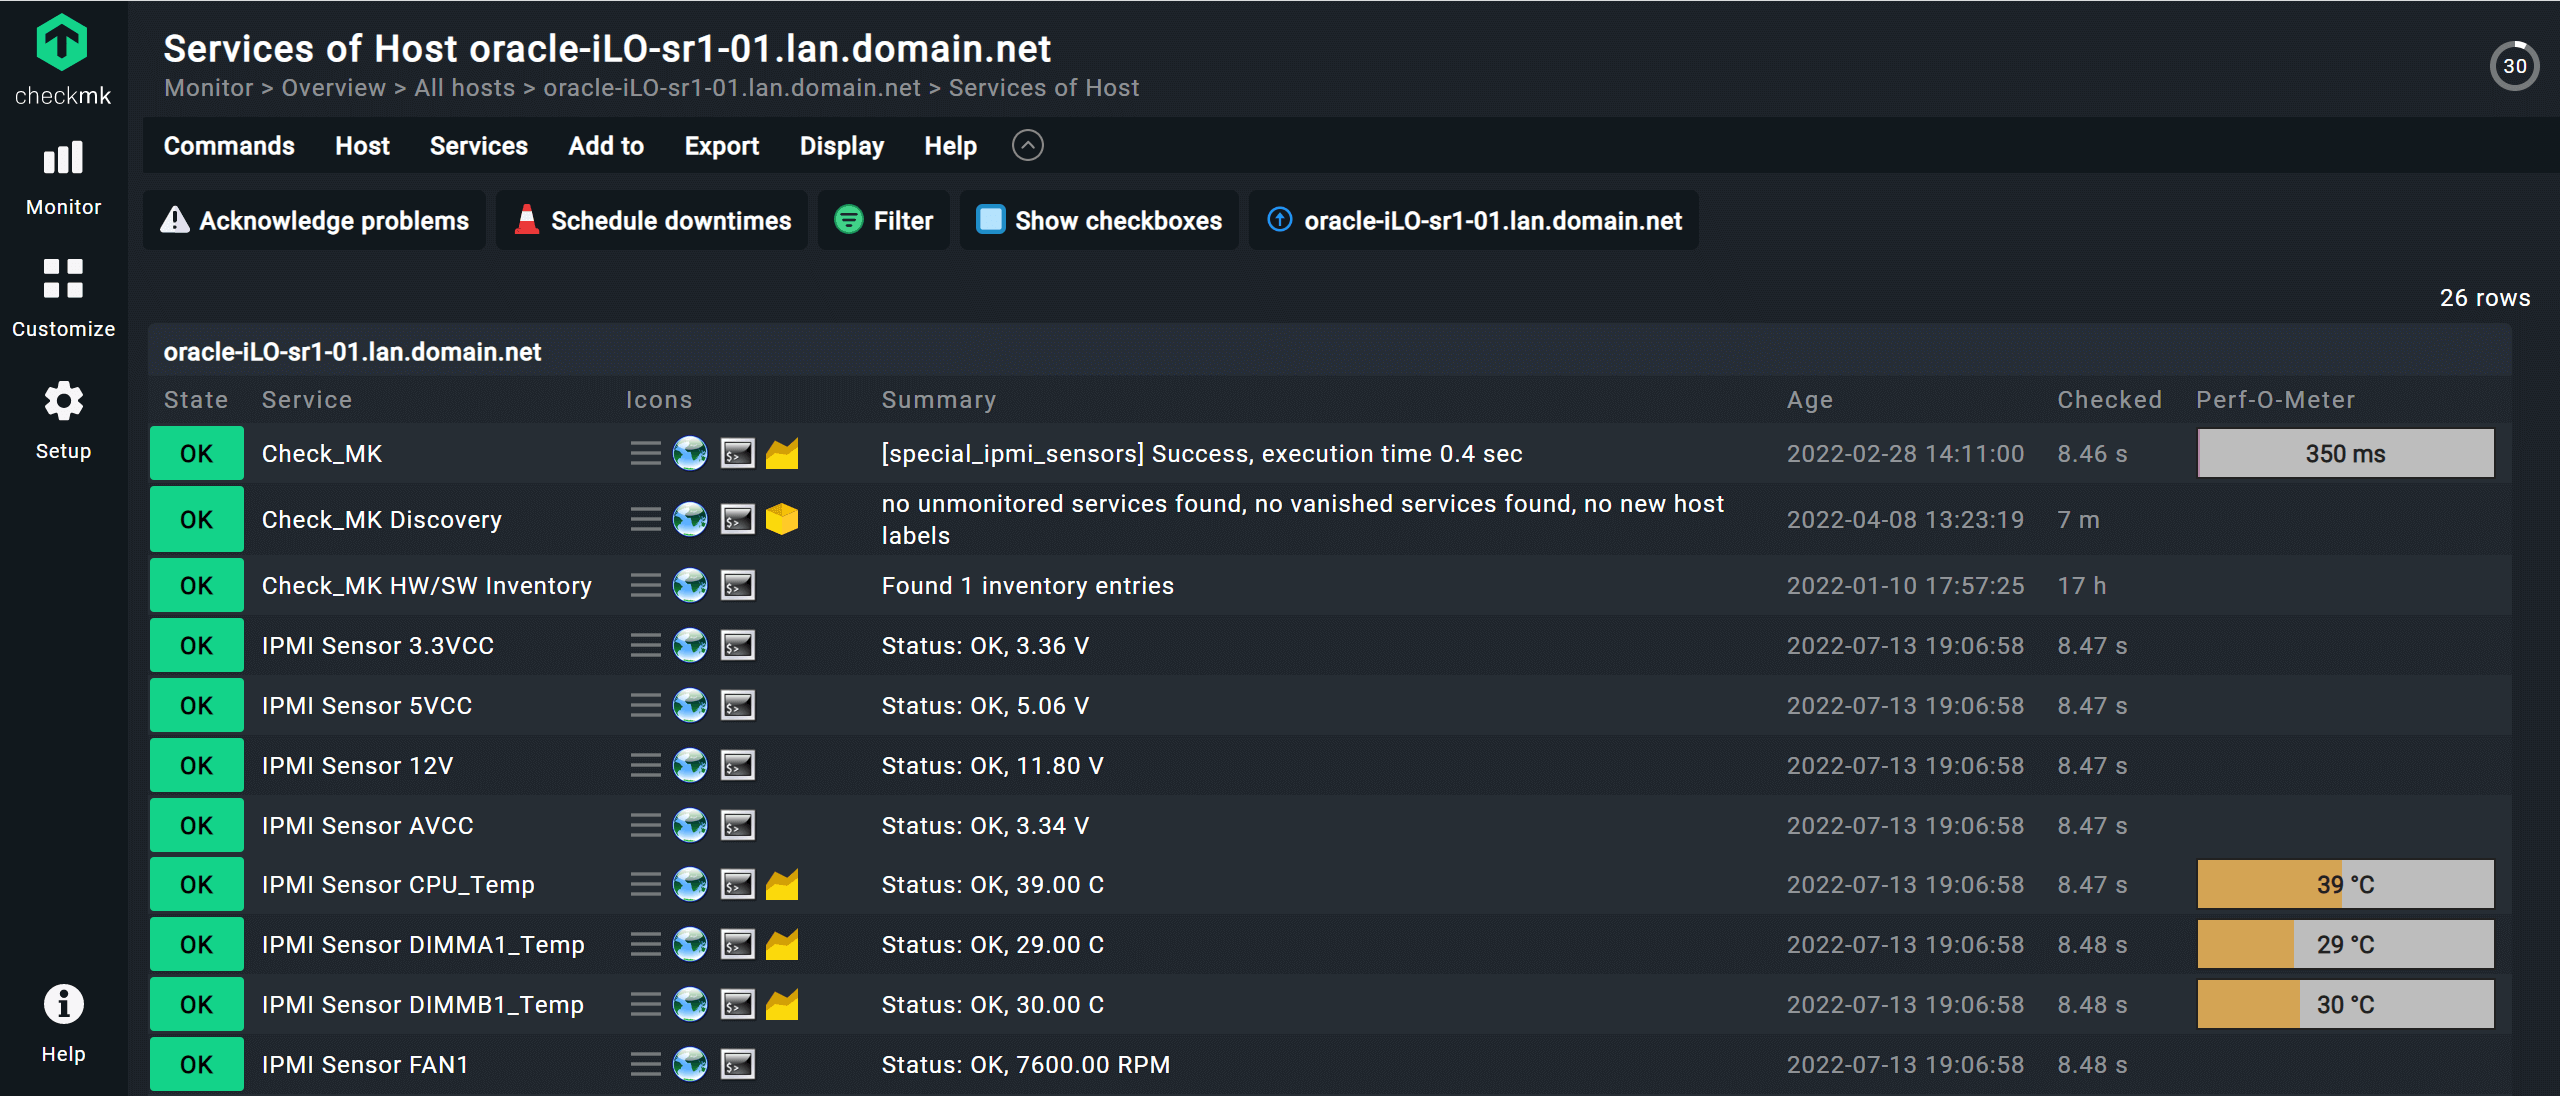
For example, here is the host view of my host for the server hardware:
Step 6: Monitoring remote Oracle databases
Especially for Oracle databases in the cloud, the installation of monitoring agents is out of the question. Checkmk is however able to log into such databases remotely and thus retrieve the monitoring data. Checkmk then transfers this information to the monitoring via a piggyback host.
The actual physical location of the remote Oracle site is irrelevant, but it must be accessible via IP for the piggyback host. On the piggyback host you must be able to install the Checkmk agent including the Oracle configuration files, and the Oracle client must also be installed. The piggyback host must, of course, be accessible from your Checkmk site.
Here, I use my local Oracle server ‘oracle-sr1-01.lan.domain.net’ from before as a piggyback host to monitor my remote Oracle database ‘DemoDB’. This is a typical scenario in hybrid database environments, moreover, an Oracle server usually already includes all of the requirements for a piggyback host.
You can however store the Oracle configuration file with the access data for your remote Oracle database on any local server as long as it meets the requirements for the monitoring of remote Oracle databases.
Creating monitoring hosts for remote Oracle databases
First you will need to create the host for your remote database in the monitoring. I do that manually in this tutorial, as I only have one host. If you have a larger number of remote databases, however, I recommend using the Dynamic Host Configuration to have the hosts created automatically based on the piggyback data.
- Go again to Setup -> All hosts and open your Oracle folder.
- Click on Add host.
- ou must use the SID of the remote database as the host name, which in my case is ‘DemoDB’. Checkmk cannot assign the data if this name is incorrect. Under Network address, activate the IP address family option and select ‘No IP’.
- Under Monitoring agents click on ‘show more’ and edit two options:
- Activate the Checkmk agent / API integrations option and select ‘No API integration, no agent’. Under Piggyback, select the ‘Always use and expect piggyback data’ option.
- Click on Save & go to folder.

Configuring an agent package for monitoring remote Oracle databases
Create a new agent package and once again use the Oracle agent rule for this:
- Under Setup, search again for ‘oracle database’ and open ‘ORACLE databases (Linux, Solaris, AIX, Windows)’.
- Click Add rule to create a new rule. Do not edit the existing rule for your local Oracle server.
- The configuration differs from before:
- Activate the Activation and Login Defaults.
- For Login Defaults, enter the information for your remote database:
- In my case, the Authentication method is again a normal user account. Keep the default setting ‘Login with the following credentials’.
- Add the user account for your remote database at User, here I have also named the access account ‘monitoring’, followed by its corresponding password at Password.

- Scroll down and activate the Remote instances (Linux/AIX/Solaris only) option.
- Click on ‘Add remote instance’.
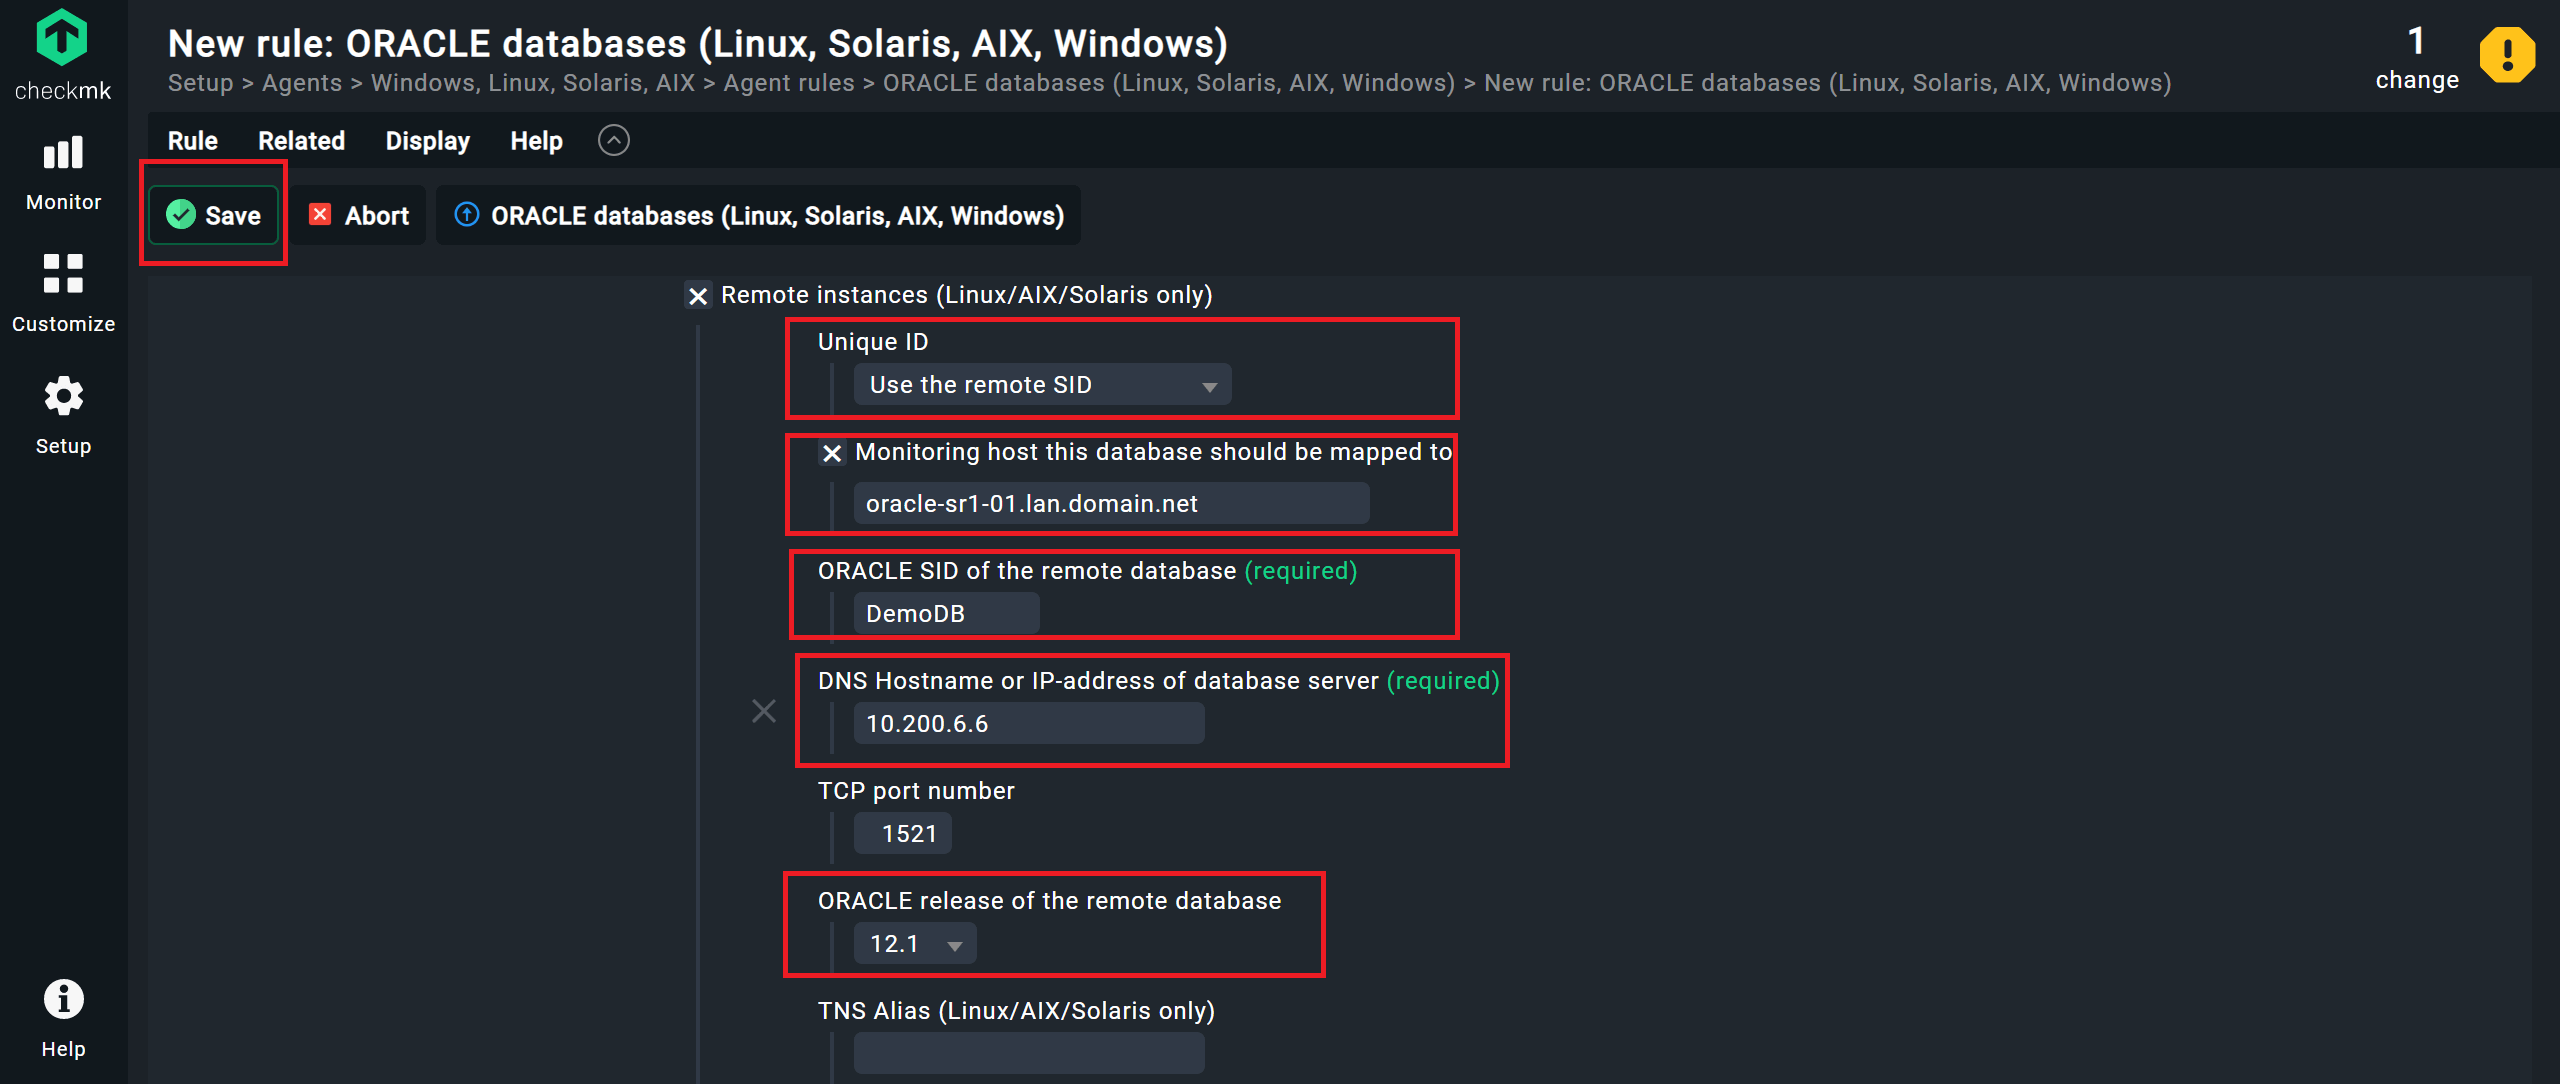
- With the Unique ID you ensure that the configuration of the connection to this external database is unique and that there are no duplicates. In my case, I select ‘Use the remote SID’.
- Under Monitoring host this database should be mapped to, select the host to which Checkmk should assign the piggyback data. For me, this host is called ‘DemoDB’.
- For ORACLE SID of the remote database, enter the SID of the database to be monitored. In my case, this is also called ‘DemoDB’.
- At DNS Hostname or IP-address of the database server, you must enter the IP address or DNS name for the database server through which your remote Oracle instance can be accessed, here ‘10.200.6.6’.
- Under ORACLE release of the remote database, select your Oracle version. For version 12.1 and newer, select ‘12.1’. In my case, I do exactly that, as I use version 19.0.
- Store the rule with Save.
Creating and installing Oracle agents
- Bake the agent as before with the Agent Bakery. To do this, click again on ‘Bake agents’ under Setup -> Agents -> Windows, Linux, Solaris, AIX.
- Download the agent package and install it on the piggyback host that you previously defined in the Oracle rule. For me, this is the Oracle server ‘oracle-sr1-01.lan.domain.net’.
Including services with the automatic service detection
After the agent is installed, you just need to add the new services:
- Go to Setup -> Hosts.
- Click on the yellow icon for automatic server detection for your remote database host, in my example it is called ‘DemoDB’.
- Wait again for the automatic service detection. Checkmk will now detect the available piggyback data, but will not expect any information via APIs or from the Checkmk agent.
- Accept all detected monitoring services with Accept all.
- Accept the ‘changes’ with Activate on selected sites. You have now included the first remote database in your monitoring.
This brings us to the end of this tutorial, and you now know the basics for monitoring Oracle databases with Checkmk.
Conclusion
Monitoring databases in general is an important challenge and there are many points you need to consider. Checkmk simplifies monitoring down to the essential steps, and at the same time you can easily perform modifications. In addition, Checkmk does not restrict the performance of Oracle applications.
Based on this tutorial, you will now be able to assemble a comprehensive Oracle monitoring system. Checkmk is extremely scalable and through its forecasting also provides a way to precisely plan your resources and future needs. A practical example of its capabilities is the database monitoring at Swisscom AG. This monitors huge databases with up to 30,000 services per host, and creates forecasts for hardware resources for leading financial companies.
